|
Fiddler’s Green Stuka Paper Model |
|
Reviewed By Bob Penikas, #36546 |
|
|
|
“That’s Paper?” One of the most rewarding statements a paper
modeler hears when craftsmen (ahh persons) see paper models on display
or in competition. Paper model kits come in magazine form therefore
storage is such a simple matter compared to the spouse aggravating
plastic kit filled boxes in the garage, closets, and under the bed.
There is also the computer downloadable paper model from the Internet or
purchased CD. Then it is simply print out what you need and print that
parts page again if the first assembly isn’t to your liking. The bulk of your time is in the construction not the painting, for the paper part assemblies, in most cases need only the white exposed cut edges touched up with your choice of a felt pen, water colors, or acrylics. Even the glue is water based; I use Aleene’s Tacky Glue. It isn’t necessary to turn on the fans, open the windows or garage door for breathable air to survive your modeling fun. Paper modeling information is freely passed on the internet. One of the most informative lists is: papermodels at smartgroups.com. There are many web sites offering free model downloads that are especially helpful for class room projects (see the Paper Model Links page at www.ipmsoc.org). Many paper model kits have parts numbering in the hundreds requiring weeks of cutting, assembling, and gluing. There are also models using only one or two pages from your printer giving you a completed model in a couple of evenings. Fiddlers Green (www.fiddlersgreen.net) is probably the best known supplier for these relatively simple, inexpensive, and absolute fun builds. Each model comes in two sizes regular or large. I selected regular and printed out this nine inch wingspan Fiddler’s Green Stuka on 67 LB Hammermill Cover Stock White. |
|
|
|
The regular size fuselage page is on the right. The larger size on
the left. The fuselage parts page has about 37 parts. An instrument
panel and pilot’s seat are provided if you would like to detail the
cockpit. A protective coating was applied using Krylon Crystal Clear acrylic. Later the assembled model was further protected by brushing on Testor’s Dullcote along with a gloss coat for the canopy and landing light covers. The Stuka wing parts page has a five section wing. You may wish to separate the flaps and ailerons from the wings as I chose. You are given a choice of making four 50 KG bombs made up of seven parts each or one 250 KG bomb made up of four parts and a swinging holder for mounting beneath the fuselage. I selected the 250 KG and holder. A three part wing alignment jig helps to get the Stuka Wing correct. Extra dive brakes are available and may be installed hanging down. I cut them out and glued them in the UP position on the underside of the wings. |
|
|
|
Brass tubing allows the propeller assembly to spin freely. Short
lengths of very thin straight piano wire were used to reinforce the
propeller blades and tail wheel. The wing jig is seen below and to the
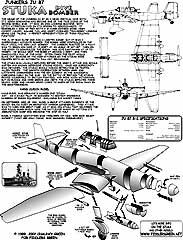
right of the propeller assembly. The Fiddlers illustrated instruction page gives a three view with specifications, a history of the Junkers Ju-87 Stuka Dive Bomber and an easy to understand exploded parts assembly drawing. |
|
|
|
Except for the nose disc there are no bulkheads. The fuselage
sections are curled around a round dowel and fit together nicely. There
are two tiny steps to each side of the next to last fuselage section on
the parts page that I somehow forgot so they don’t appear in the photos
I’ve furnished with this write up. Sections from a shaped tooth pick were used for the aft canopy gun barrel and antenna post. To fasten the flaps I cut out V shaped hinges from 67 LB cardstock. Paper modeling has so much to offer. Give it a try. Have fun! |
|
|
|
Information, images, and all other items placed electronically on this site are the intellectual property of IPMS/USA ®. |
)
)
)
)