| ICM |
| 1/72 Messerschmitt Bf-109E-3 & Bf-109E-4 |
| Kit Number: 72131(E3), 72132(E4) |
| Reviewed by Brian Baker, IPMS# 43146 |

|
|
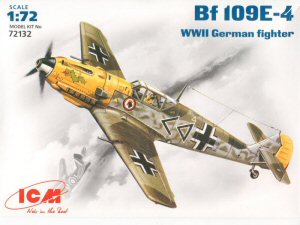
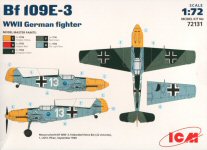
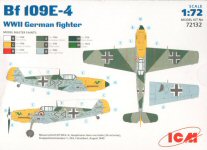
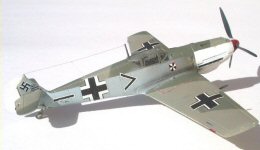
MSRP: $12.00 Imported into the US by Testors Corporation (www.testors.com). Introduction What? ANOTHER kit of the Messerschmitt Bf-109? What with Revell, Airfix, Matchbox, Hasegawa, Heller, Academy, Tamiya, and who knows who else, do we really need another kit of the "Emil"? Apparently, ICM thinks we do. They have produced some very nice kits in recent years, and I have built a few. They are accurate and highly detailed, and worth getting. Previously, they have concentrated on more obscure Russian types, so this may be their first foray into the realm of standard popular aircraft. The Messerschmitt Bf-109E was one of the most famous fighter aircraft of all time. If you are unfamiliar with the type, and are an active modeler, you are probably living on some other planet. Hundreds of books and articles have been written on the subject, so I won't repeat the story again. There are many sources of information available. Some of the more recent references that I have found useful are the Squadron "In-Action" series on the Messerschmitt Bf-109, Volume 1 and a recently published book from France, "Planes and Pilots" Messerschmitt ME-109, Vol. 1, From 1936 to 1942, by Anis Elbied and Andre Jouineau, which includes extensive color information not previously available. There is certainly no shortage of good reference works on the ME-109. The Kit These kits are actually companions, differing only in instructions and decals. The moldings are identical. Actually, although depicted as BF-109E-3 and E-4, parts are included, excluding drop tanks and racks, to do any variant from E-3 forward, as differences are really rather minor. There are a few parts, notably spinners and a tropical carburetor air filter, that won't be used for these variants. But I'm sure that later issues will require them. The kit includes one sprue of soft white plastic, containing 43 parts, and one clear plastic sprue containing 7 parts, including canopies for both variants, a very detailed gunsight, and an extra armored windshield section as used on some E-4 variants. Each kit contains decals for two aircraft. Casting is of very high quality, approximating that of the best kits on the market, and the fit is almost "snap together" quality in most respects, although a lack of locator pins caused a few problems in assembly. A few parts had minor amounts of flash which was easily trimmed off. The moldings are very finely detailed, with thin panel lines and some details not found on other high quality kits. The canopies provided are for the E-3 and E-4 versions, and one curious feature is the fact that the E-3 version has provision for an open canopy, which is certainly appropriate, given the generous amount of cockpit detailing that can be seen on this model. The E-4 version, however, can only be built with the canopy closed, and would require careful cutting of the canopy to allow it to open. Since the canopies are very petite (translate thin and fragile), I would not advise that unless you are a true master modeler. Decals Decals are provided for two aircraft each, although there are plenty of after-market decals available for these aircraft. The E-3 kit decals are for "Red 16", the aircraft of Oberleutnant Fritz Losigkeit (68 victories) Staffelkapitan of 2/JG26, based at Bonninghardt, Germany, in March, 1040, and "White 13", a Bf-109E flown by Feldwebel Heinz Bar (220 eventual victories), of 1/JG51, at Pihen, France, September, 1940. The E-4 kit decals are for "Black Chevron", flown by Oberleutnant Franz von Werra (21 victories), Gruppen-Adjutant, II/JG3, at Samer, France, August, 1940, and "Black Chevron-Black Delta", flown by Hauptmann Hans von Hahn (34 victories), Gruppenkommandeur, I/JG3, at Colombert, France, August, 1940. All of these aircraft appear to be Battle of Britain veterans, and in fact, von Werra's aircraft was shot down and landed intact in England, so the type is well documented. Having read the biography of von Werra many years ago, entitled "The One That Got Away", I chose to do his aircraft, as he seems to have been one of those fascinating characters found in any air force during wartime. He had a lion cub as pet, and was popular with the press. Von Werra was made prisoner of war after one of his unauthorized visits to England resulted in an unintentional forced landing, and after he was shipped to a POW camp in Canada, he managed to jump off of a train and make his way to the United States, being one of the first illegal aliens to come here. (The U.S. was not at war with Germany at the time.) He finally made his way to Mexico, and subsequently got back to Germany, the only Luftwaffe POW to return to active service. He was later killed in action in another Bf-109E. The decals are of very high quality, although they have a definite matte finish. They are thin, and adhere well to a glossy surface, although there is some clear edge visible on some of the smaller decals which is difficult to overcome with gloss and matt spray. Under a magnifying glass, they show considerable detail, and all of the small numbers and letters of the maintenance stenciling are quite readable. They are as good as any kit decals I have worked with, and are completely on color and register. Instructions Each kit comes with one sheet of assembly instructions and one sheet dealing with the camouflage and markings of each aircraft. The E-3 box includes a color illustration and side and plan views of Heinz Bar's aircraft, while the E-4 kit box depicts the same information on von Hahn's plane. The colors appear to be pretty close, although they follow the unfortunate pattern of not using Luftwaffe RML color codes, relying on such vague descriptions as "matt dark green" and "matt slate grey", along with Humbrol numbers. RLM color codes would have been helpful, as they seem to be almost universally used by modelers of Luftwaffe aircraft. In addition, I would have liked to have seen more detailed information on cockpit interior colors, as these kits can certainly be highly detailed straight from the box. There is one marking discrepancy that should be noted on von Werra's airplane. The drawings show the spinner as red and white, with half the spinner in each color. Photos of the actual crashed aircraft show the spinner in quarters, two red and two white. A little picky, maybe, but the photo was readily available in the book by Burt and Leasor entitled The One That Got Away. I didn't check that until after I finished the model and remembered that I had a copy of the book stuffed away on a shelf in my workshop. The exploded assembly drawings are very well done, although dihedral angle is not given, and a front view is not provided. That being said, the assembly instructions are some of the best I've seen on modern kits in any scale. The sheets giving marking details are a little harder to decipher due to the method of reproduction. There is no indication of the placement of the tail swastikas, as apparently these did not exist on German wartime aircraft as they offended the politically correct crowd. They ARE on the decal sheet, however, in four pieces for each swastika. I just used a Microscale sheet; it was a lot less work. Some of the decals were incorrectly identified, and some were not used at all. One would assume that in the Luftwaffe at that stage of the war, they would have had some uniformity in detail stencil markings on their aircraft. Maybe not, though. I wasn't there. Assembly Assembly is rather simple for a kit of this type, although an attempt has been made to allow the superdetailer to add embellishment like engine details. The cockpit interior should be assembled and detailed first, and this is explained fully, although color details are somewhat fuzzy. I added masking tape seat belts, which added to the realistic effect. I also painted the instruments on the panel, and placed a drop of Krystal Klear on each face to simulate glass. A decal here would have been useful, but the effect is just about as good. Once the interior is complete, attach the instrument panel to the right side of the fuselage interior and make sure that it is straight. The cockpit interior can then be glued into position, and it goes into place easily. The fuselage halves should then be glued together, and this can present a problem since there are no locator holes. They line up pretty well, however, but it requires careful assembly. For best results, start with the front and work your way backwards, as a misalignment could result in the wing not fitting correctly. The wings are a no-brainer. There is some wheel well detail that needs to be painted before the wing panels are joined, but the assembly is easy and should present no problem to an experienced modeler. Attaching them to the fuselage is a different matter, however. The fit is so tight that although I didn't do any trimming, I had to use a rubber band to force the wing into the proper dihedral angle. Nothing looks worse to me than a model airplane with improper dihedral. The rubber band did the trick, though, and the overall appearance is right on. Some filling was required where the rear of the wing meets the fuselage, and also along the top and bottom fuselage seams. The tail unit is very petite, almost too delicate. The rudder tabs need to be trimmed before they will fit, and there was a lot of flash on the rudder that needed to be trimmed off. Both kits are the same in this respect. The elevators and horizontal stabilizers have to be carefully aligned, and this should be done after the wing is in place and set up. The tabs are very small, so be careful here. If they are properly positioned, the struts will go in later without incident. Once the basic airframe is assembled, the canopy should be positioned and masked so that painting can begin. The cowling tops and bottoms can be painted separately, or they can be glued on and masked, as they are usually brightly colored in white or yellow if you are using kit decals. The fit is pretty good, and the engine section is done in such a way so that I think you could do a pretty good superdetailing job on the engine using the blank as a basis for beginning. The side carburetor air intake goes on separately (a tropical scoop is provided, probably for a later kit issue), and the intake under the engine has several interior parts that must be painted before assembly. The canopy armor needs to be glued into the canopy frame, and I had to trim mine, as the canopy would not fit down on the cockpit sides with the armor in place. It would not matter so much on the E-3 version, as this can be done with the canopy rotated to the right After painting, the landing gear, which is very nicely detailed, went on effortlessly, and the wheels were glued on in perfect alignment. The prop, however, is a different story. It is cast in one piece, but mine seemed to have the blades slanted slightly forward. The forward part of the spinner fit perfectly, but the rear spinner plate would not fit up against the rear of the prop hub. I had to hollow out the rear plate so that it would fit. Even with the spinner now fitting properly, getting it to fit into the unique nose receptacle, with grooves in the top and bottom, but not lined up, took some effort. The shaft just flat doesn't fit, and I wound up just trimming the inside of the cowling with an X-Acto knife until I could force the shaft into place. It doesn't spin, but then, why should it? Painting and Finishing For von Werra's aircraft, my sources told me to use RLM 02 and RLM 71 green topsides, with RLM 65 underneath, with no side mottling. The spinner, by the way, is half red and half white, but this is unclear on the instruction sheet. Decals went on smoothly, and the kit instructions, aside for a few decals that seemed to have no place to go, were fairly clear. I used a coat of Glosscote before decal application, and Dullcote later, which allowed the decals to merge into the paint adequately. With a little weathering, the job was almost finished, with only the carburetor air intake, tailplane struts, aileron balances, pitot tube, 20 mm wing cannons, tailwheel, and LF radio antenna mast to complete the job. I used electronic wire for the LF wire antenna. Recommendations This kit was a fun build. It didn't take a lot of tedious correcting, and everything seemed to work out for a change. The model LOOKS like a "109" and that is the important thing. It is now in my cabinet with approximately 80 other 109's, and it looks better than most. I would recommend it highly, mainly because of the detail and ease of construction. It seems to have the potential to be built as any of the major production versions, and it is probably cheaper than some of the Japanese issues, and certainly just as good. It would definitely make a good modeler out of an average one. Get at least one of each. Thanks to ICM, Testors, and the David L. Veres Companies for the review samples. |


|
|
Information, images, and all other items placed electronically on this site are the intellectual property of IPMS/USA ®. |