|
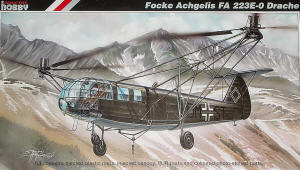
Special Hobby 1/48 Fa-223 Drache |
|
|
Kit Number 48020 |
|
|
Reviewed By Dave Morrissette, #33653 |
|
|
|
|
|
MSRP: $47.00 USD I have been waiting for this kit since it was announced – I love the German innovations in flight during WWII. The Fa223 Drache (Dragon) was the world’s first helicopter to reach production status. It was also the first helicopter to fly over the English Channel. Special Hobby’s kit is a multimedia one containing four gray and one clear injected molded sprues; two PE frets- one colored and the other plain and two small resin parts. The parts are all well done and the injected molded parts are very nice with subtle fabric detail. The clear parts are great. Some scratch building is required, primarily for the rigging on the rotor booms and tail. Construction replicates the build of the real thing that was a metal frame covered in a fabric skin. One thing I noticed on reviewing the parts (parts are numbered on sprue drawings but not on the sprues) was that the kit had suffered some breakage. One of the plastic frames which went into the cockpit was broken and worse, so was one of the resin legs to the rotor supports. All fixable, but it added to the construction. Let me say this before I get too far. This is a limited run, multi media kit of a rare and unusual subject. I am going to build it with that in mind. It is not a “simple, slap it together and it will all fit perfectly without work kit”. That being said, the overall fit and finish was very good. Also, I decided before I got too far that the left and right rotor booms would need better support to the body and I pinned everything as the rotor booms also bear the weight of the kit and large rotors. The cockpit consists of injection-molded frames that are joined together and attached to a bulkhead that would separate the pilot from the engine. The parts are small, scale thin and fragile. I lined the basic shape up and used Tamiya thin glue to touch the joints on the frame and let it dry thoroughly. I added a PE seat from the Reheat line and added the nice colored seat belts and other details to the cockpit. While this dried, the back of the fuselage was built. This is a simple two-piece affair. To replicate the gap between the front and back halves, Special Hobby did an outstanding job using framework similar to the cockpit to add to the tail that holds it to the front half. This is delicate but stood up well. I drilled holes deeper than given for the back half’s frame to provide additional strength, and had no issues. The front half was finished and the windows installed. Could have refined this better. The front was closed trapping the back half and it was set aside to dry. I moved onto the rotor booms, which are a combination of plastic and resin. I pinned both ends of each boom (5 pins per boom) to both the fuselage and to the resin supports. For the broken mount, I slowly built up super glue over a metal pin and then sanded it and got a fair representation of the resin joint. This is a difficult set of steps as you have to align the booms and wheel supports and use mixed media. It can be done. In hindsight, I should have taken a little longer as I see a few alignment issues. The booms were then attached with super glue to predrilled holes in the fuselage and rigging attached with ultra thin wire. The clear nose sections was polished, masked with Tamiya tape, and attached with Elmer’s. Fit was excellent with only problem being that the model was getting very finicky about being touched with all these delicate parts. The rear tail was left off for painting. I used Xtracolor RLM71 for the top and RLM 65 for the bottom. Some shading was done with ComArt Transparent Smoke and it was time to decal. Here, I had a problem. About half of the decals (swastikas, call letters) came off OK and were thin. Some did not come off the backing paper at all and it look like the backing paper was covered with something that prevented water from even soaking into the paper. I used a set of German markings crosses from Meteor to replace the stubborn decals. A little flat coat and removing the masking and we’re done. This kit was a lot of fun. I love the subject and greatly applaud Special Hobby for making such an interesting piece of a historic helicopter. I recommend this kit completely but do suggest that before building this kit that you have some experience with resin, PE and limited runs kits but if you do, buy it. Thanks to Special Hobby for the review kit. |
|
) |
) |
) |
) |
) |
) |
) |
) |
) |
) |
) |
) |
|
|
|
|
Information, images, and all other items placed electronically on this site are the intellectual property of IPMS/USA ®. |
|
)