|
Classic Airframes 1/48 Supermarine Attacker |
|
|
Kit Number 4102 |
|
|
Reviewed By Paul Bradley, #35554 |
|
|
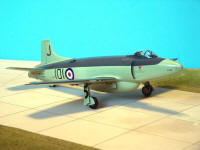
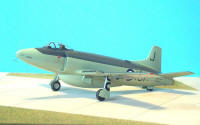
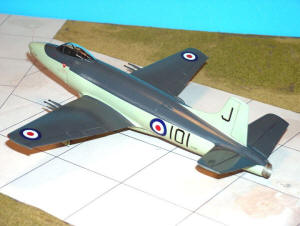
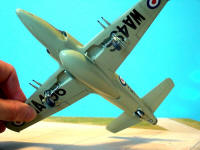
MSRP $55.00 USD The Supermarine Attacker can hardly be called a classic, nor is it particularly well known amongst modelers, but it does have the claim to fame of being the first operational Fleet Air Arm jet fighter, and one of only two operational jets with a tailwheel undercarriage, and is therefore worthy of at least a footnote in our history banks. It also has some of the cleanest lines of any jet aircraft ever produced, and that should also appeal! The prototype first flew in 1947, but it was not until 1951 that 800 Squadron became the Fleet Air Arm’s pioneer jet fighter squadron. The aircraft deployed on HMS Eagle in early 1952, and this was the only carrier on which Attackers were deployed. With the coming of the superior Hawker Sea Hawk in 1954, the Attacker’s operational career was over, though some lingered on in second-line service until 1957. 61 F.1 and FB.1 plus 84 FB.2 aircraft were built, the major difference being engine type and external stores carriage. Only one Attacker survives at the Fleet Air Arm Museum at Yeovilton, England. The Attacker has accordingly been poorly represented in model form, the only prior injection kit of the aircraft was the very old 1/72 Frog kit. There has only been one previous 1/48 kit and that was the old Falcon vacuform kit. Classic Airframes has come to the rescue again, producing this 1/48 limited run injection kit that also features some very nice resin parts and a small photo etched metal frame. Construction starts with the fuselage, which is molded in four pieces. The forward fuselage including the cockpit is separate to give full depth intakes – a nice touch. The parts fit well with little fiddling. Into the forward fuselage is inserted a resin cockpit tub that needs very little adjustment to simply slot into place – a vast improvement from previous CA kits! The resin seat is enhanced by photo etched belts. Also fitted at this stage is a wing spar/compressor front to aid with fitting the wings. The fin is split with the rudder and half the fin on one fuselage half and part of the fin on the other, leading to a nasty little seam that requires care to clean up. Not sure on the reasoning behind this, as although the split follows a panel line, the parts don’t match up well. The other blight on the fuselage is the addition of a resin tail cone. This part is marginally smaller in diameter than the plastic parts and despite my best efforts I still have a noticeable step between them. I cannot figure out why this part of the fuselage was made separate – I think a resin tailpipe to insert inside an all-plastic fuselage would have worked better and eliminated the step. The wings fit together well, with integral wheel wells. There is a separate resin insert for the cannon, and this part also does not fit well, it being too shallow for the wings. This was a tricky one to fix because of the contours around the base of the cannon, but I suggest ensuring that the top lines up and filling on the bottom, as it is less noticeable. A delicate sanding job followed by a re-scribe and the problem is fixed. Another area to fix is the flaps. These are molded separately, but as with many aircraft types the flaps were not routinely deployed when the aircraft was at rest. In order to have them in the “Up” position, I needed to remove the flap guides molded into the wing upper surfaces - a quick fix with a sharp scalpel blade. Fixing the wings to the fuselage is complicated by the fact that the slots for the wing tabs are heavily flashed over – a mold problem? This took a little time to drill out, but the fit of the wings is very good once this is done and the wing spars are a great help here. Similarly, I needed to slightly enlarge the slots for the tail-planes, but these also fit well and at the correct dihedral with little effort on my part. One obvious feature of the Attacker is the VERY large 250-gallon ventral auxiliary fuel tank. This is nicely molded and with just a light sanding fits very well indeed. Its location is not marked on the plastic, but it is pretty obvious that it can only go in one place. Don’t worry about too a tight fit, as the tank had a sealing strip that can be replicated by running white glue into the seam – this is obvious in photos of the real thing. With the bulk of the airframe complete, it is time to paint and decal. The decals by Microscale feature three aircraft; two are Fleet Air Arm with the typical Extra Dark Sea Grey over Sky color scheme, and the other is an overall Aluminum machine of the Pakistani Air Force, the only other operator of the Attacker. I chose to model the operational Attacker of 800 Sqn, FAA, aboard HMS Eagle in 1952-3. The decals are a joy to use – I am very impressed by Microscale decals these days. They are thin and conform well to the surface and I had no problems with silvering. One area to watch for is the under-wing serials, as these are split over the gear bay doors and over the shell collector bulges. The injection molded canopy is an excellent shape compared to photos, but take care with the canopy framing as the F.1 had a bubble top, whereas the FB.2 had an extra metal section at the rear. Luckily, the framing is very lightly marked and is easily sanded off for a Mk.1. I for one am very pleased that Classic has reverted to injection molded canopies – not all of us are “supermodelers” who have consistent success with vacuform canopies, and I feel that an injection molded canopy is easier to work with if there happens to be a problem such as the framing. Of course, there is no reason why Classic and other manufacturers couldn’t include both for a little extra cost. Now that the basic airframe is complete, the undercarriage is added. This is not particularly well done – it has to be said that the secondary sprue is a bit short on finesse in places, and has clumsily large gates. I had to work at cleaning up each part, but I found the tail wheels to be unusable and replaced them from my spares box. The pins for the main legs need to be trimmed to fit in the corresponding locations in the wheel wells, but the effort is worth it as the legs will then fit at the correct angle. Aerials and pitots are provided as photo etched parts, but as these are created flat, I replaced them all with fine wire. Please note that the Attacker had only one pitot, located on the port wing, rather than the two indicated by the instructions. References for the Attacker are somewhat limited. I found few photos online, but had better luck with my library. I found two very nice period shots in the book Fleet Air Arm in Focus part 2 by David Hobbs, published by Maritime Books (available at www.navybooks.com). One is of the HMS Eagle machine featured on the decal sheet and clearly shows that this aircraft had the early hood. Another useful reference that arrived almost too late to be of help to me is Scale Aviation Modeller, volume 12 #2, which features a build report for this kit plus a series of useful walk around shots of the sole surviving Attacker. This is a nice kit of an unremarkable aircraft and I am grateful to Jules at Classic Airframes for his continuing fascination with post-war British aircraft. As I have pointed out, there are some minor problems to be solved with this limited run kit, but there really is nothing here to put off anyone with a couple of Classic’s kits under their belts; in fact, I think this is one of their best efforts to date and I can heartily recommend it. Now, perhaps we could see a Scimitar or Sea Vixen to round out our collections of post-war Fleet Air Arm aircraft? My thanks to Jules at Classic Airframes for the review sample and to him also my sincere apologies for the length of time that it took me to finish it. Classic Airframes kits are available at their website classicairframes.com, or from all leading distributors and hobby stores. |
|
 |
 |
|
Information, images, and all other items placed electronically on this site are the intellectual property of IPMS/USA ®. |
|

