|
Quick Trees |
|
By Terry Huber, #40782 |
|
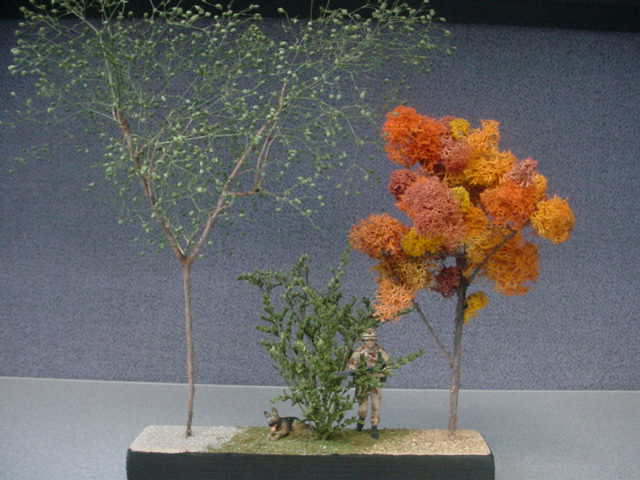
Enhancing a diorama is not always easy. Several components need to be considered to make the scene ‘come alive’. One way to accomplish this is to place a few trees and shrubs within the scene. I have experimented over the years making scale trees out of railroad scale lichen moss and natural branches, but also have used dried flowers such as Mini-gyp for branches, and Caspia for shrubs. The process has been shown to be relatively easy and quick. The lichen is available at hobby and railroad shops, and the dried flowers are available at craft stores such as Michaels. The fresher the dried flowers, the better. Look around your yard or surrounding area. Ever notice shrubs and bushes tend to have undergrowth on them which if cut properly, resemble small miniature tree trunks and branches. I have used Pirates’ Tea bush or Myrtle bush branches cut at the right area and stripped of the greenery. Look for old and gnarly looking areas to cut. Trim the tree down to have a trunk shape and five or six branches. This will be the starting point. The tree can be held using locking tweezers by the trunk to assemble, or placed into a small hole that has been drilled into a wood block to the trunk size. Different shades of green lichen moss tend to look better than trying to make a tree with all of the same shade. Or you could use the fall colors of lichen depending upon which type of scene you wish to recreate. Break off small rounded areas of lichen from the main bundle and glue these clumps onto the branches of your tree, using white glue such as Aleene’s Tacky Glue, or small amounts of thick Super Glue. You may need to use a glue kicker with Super Glue to hold the ‘leaves’ in place. Work on different branches at a time so the other clumps will dry properly. Continue to build on top of the other clumps so that the tree becomes fuller and more to shape. Work from the bottom up and out. |
|
Jerome McDonald photo |
|
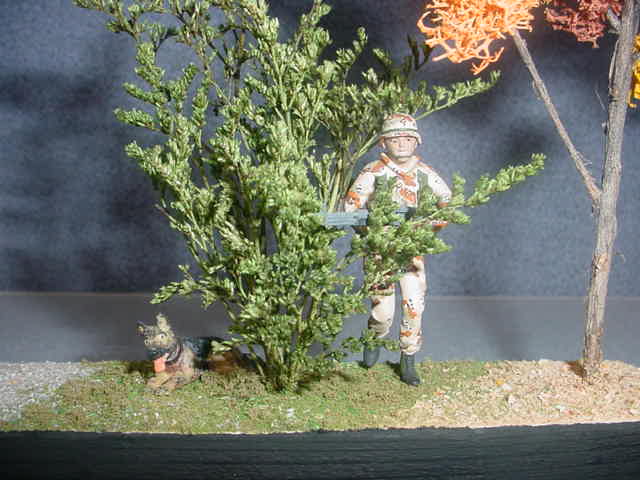
This process can create a nice 7” tree (approx 24’ in 1/35 scale) in about an hour. Another method to create leaves and branches is to use Mini-gyp dried flowers. Sometimes the Mini-gyp that is available is not the right shade of green. Use spray paint to paint clumps of the Mini-gyp prior to assembly. Once the paint has dried, cut small branches of the upper stalks of the Mini-gyp and glue them onto the trunk and shrub branch areas to represent smaller branches and leaves. After the tree has dried, it is ready to be placed into the diorama. Drill a small hole in the diorama base that will hold about ˝” of trunk base. Squirt a small amount of glue in the hole and ‘plant’ your tree. Position it so it is straight and level when viewed in all directions. This tree takes about an hour and a half to build. Be sure to plant odd numbers of trees instead of even amounts. Use three trees instead of two, five instead of four etc. An odd number has been shown to look more natural, and more appealing to the eye. To make natural looking bushes, first drill a small 1/8” diameter hole into the diorama base. Place a small amount of glue into the hole. Cut small top sections of Caspia and bundle them together into a small bouquet then place into the hole. Spread them out to represent bushes and branches. This entire process should take about ten minutes. |
|
Jerome McDonald photo |
| This dried flower has a nice natural green look to it already so it does not need to be painted. Again place odd amounts of these bushes within the diorama. Caspia can also be used to make trees by gluing small cut branches to the trunks of straighter taller tree trunks and placed in a down position to represent pine and coniferous trees. Try these quick techniques on your next diorama or vignette. |
|
Information, images, and all other items placed electronically on this site are the intellectual property of IPMS/USA ®. |