|
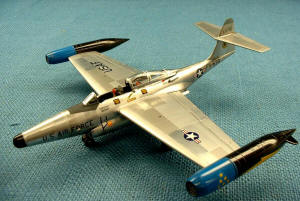
THE APPLICATION OF ALCLAD What works best for me… |
|
|
By Ed Kinney, #2989 |
|
| Let me state up front that if the directions on the Alclad bottles (Caution here…they are different for some colors!) are followed, there is no reason that your model should turn out with anything but a spectacular natural metal finish. That said, and this is purely personal, I have long had an aversion to alcohol/water based acrylic paints. We just for some unknown reason don’t seem to get along. So…let’s begin with basics: | |
|
Sunday 9:30 AM – Step #1 -
|
|
|
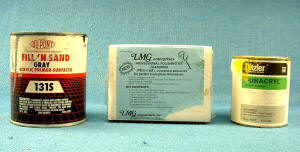
After assembly, being careful to make sure that no sanding scratches or file marks are visible, I apply first a mist coat, followed almost immediately with a heavier coat of any good automotive “scratch filling” primer. This can be obtained in any quality auto paint store. I use Dupont, but other brands are just fine. Drying time is about 15 minutes, followed by dry sanding with 600 grit paper.
Sunday 9:50 AM – Step #2
|
|
|
I then wipe the aircraft down with isopropyl alcohol using lens tissues (lint free). This will dry within a couple minutes. At that point, I will use any color of acrylic lacquer that may be handy. In this case, since the rocket pods were black, that is what was used, although as stated, the color doesn’t really seem to make a difference. Should you desire, Sig or Aerogloss Butrate Dope can also be used. Just a word of caution here. If you are spraying any of the colored lacquers or the Alclad lacquers, don’t do it in a high humidity environment. Humidity will cause the paint to “blush”, so a word to the wise. The color coat was left to dry for 30 minutes by the clock.
Sunday 10:30 AM – Step #3
|
|
|
I then use a product called MicroMesh, available from Micro Mark (if you don’t have one of their catalogs, by all means get one! Lots of neat stuff!) either in polishing cloths or small pads that range from 2,400 grit through 12,000 grit. Usually I start with 2,400 and finish up with 12,000, water sanding with both grades. When you are satisfied with the smoothness and the gloss of the finish, time for another alcohol wipe down. After drying, the base coat of Aluminum Alclad is applied. For informational purposes, I almost exclusively use a Pashe single action airbrush with the finest tip using 12-15 lbs pressure, but any good airbrush will do.
Sunday 10:50 AM – Step #4
|
|
|
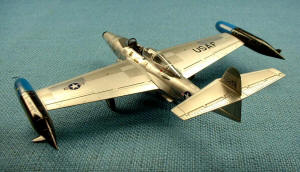
The first shade, Aluminum is applied and allowed to dry for 15 minutes before masking.
I have found that the best source of masking dissimilar panels is a set of good black and white photographs. After the masks, using Tamaya tape, are in place, the second shade, Polished Aluminum, is applied. Another 15-20 minute drying period, and masking for the next color begins.
Sunday 11:45 AM – Step #5
|
|
|
With the masks in place, the third color, Dark Aluminum, is applied. Another 15-20 minute wait and masks for color 4 are applied.
Sunday 12:10 PM – Step #6
LUNCH – A must!!
Sunday 12:30 PM – Step #7
|
|
|
The next color, Magnesium, is now applied. Another 15 minute wait, then yet more masking.
Sunday 13:05 PM – Step #8
|
|
|
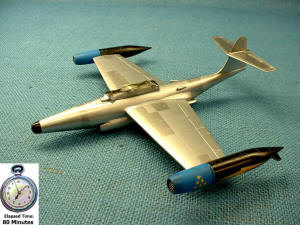
Stainless Steel – Here I cut a small corner. Instructions call for with both chrome and stainless steel to coat these panels with gloss black enamel prior to applying the Alclad. What this does, is improve reflectivity with these high polished finishes, but I didn’t want a “super brite” stainless finish. I sprayed the stainless directly on the previous shade of Alclad and they came out quite well, albeit not as “knock your eyes” out with brilliance as if pre-coated.
Sunday 13:30 PM – Step #9
After another 20 minute wait, the final colors, flat black anti glare and ADC grey fin tip were sprayed.
Sunday 14:00 – Step #10
|
|
|
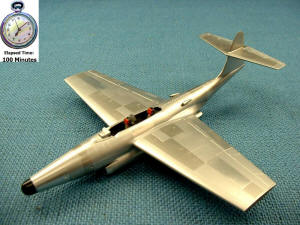
The aircraft is now read for decaling. Caution! Use nothing stronger that micro set (blue bottle) for a setting solution. And use it sparingly…Don’t let the solution set on a painted area any longer than absolutely necessary. After I apply it, I use small cut up pieces of paper towel to remove any excess that is not directly on the decal itself. I normally wait about 30-45 seconds before applying first a dry q-tip to place the decal followed by pressing hard into place with the paper towel segment. All decals, once in place, were allowed to dry for one hour.
Sunday 15:30 – Step #11
|
|
|
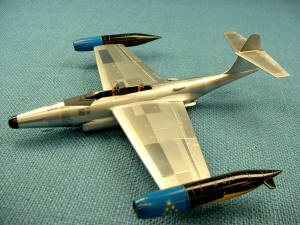
Wash and weather: I use tube water colors for a wash, thinned with water and a few drops of laundry detergent. Colors I use are black and dark umber mixed together. These are applied with a pointed brush in the panel lines (Neatness is not necessary) and left to dry for 30 minutes.
The excess wash is then removed by using those small squares of paper towel, slightly dampened (I will just touch the towel to the inside of my lower lip!). Wipe the excess in the direction the aircraft flies, removing as little or as much as suits you. When complete, I will use a dry paper towel to take off any unwanted residue.
Sunday 16:25 – Step #12
|
|
|
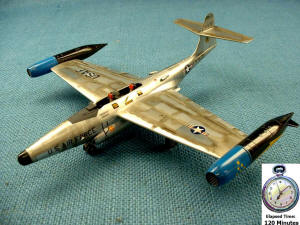
At this point, aside from final assembly (10 minutes) you’re finished. I strongly recommend against over coating Alclad with anything, flat or gloss, in that it will tend to eliminate most of the color differentiation, which is what we set out to accomplish in the first place.
And there you have it…Scorpion for a Sunday!!!
Sunday 16:45 – Step #15 - FINITO! |
|
) |
) |
) |
) |
|
In conclusion, this product is the finest of its kind that I have seen in over 50 years of pursuing the consummate Natural Metal Finish. Strongly recommended !! |
|
|
Information, images, and all
other items placed electronically on this site |
|