|
Hudson & Allen Products Tall Green Grass, Forest Litter, Mud, Bricks |
|
Reviewed By Dan Shepard, #30009 |
 |
|
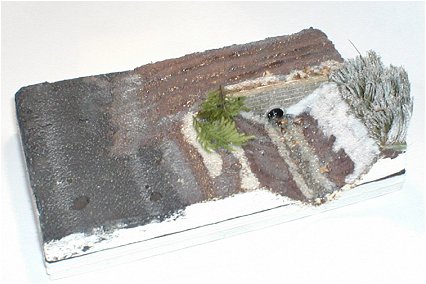
What happens when several ton of bricks, a couple cubic yards of mud, enough asphalt to construct a nice driveway, enough snow to cover that driveway, an equal measure of slush, and, for good measure, a pile of pine boughs and tall green grass? Well, you make a mini diorama trying to incorporate all these elements to give fellow modelers an idea of some of the fine products Hudson and Allen studio is putting out. My eyes were quickly drawn to the bricks. The package contained a lot of what looked like 1/35th scale bricks with a nice, uniform color of new brick. There was enough variation to the color so it didn‘t look painted. The brick was made of a material that could be broken into bits and pieces to form damage. It was easily cut into smaller pieces. I still had the nagging question of just how does one take several hundred (I must admit I have not counted how many bricks there are in a package) and build a wall without having to have the patient of Job. An idea occurred to me to glue the bricks, one at a time on a strip of heavy card stock to represent the mortar layer and insert another strip in-between each brick. I cut the base strip of paper slightly thinner than the brick to represent the inset mortar joint. After I glued the first brick on with white glue, I attempted to insert a strip of paper for the vertical joint. I found this to be rather time consuming and decided to judge the vertical mortar joint by eye. This worked out fine. I had poured out a pile of bricks that I had estimated would do the job and used a #11 blade to pick up the brick, touch it in the white glue and set it. In no time, I had my first row complete. The next row started the same and when I glued it onto the first row, I made sure to offset the bricks by one-half. I could immediately see that this was going to be easy. After constructing what was to become a vee-shaped headwall for a culvert, it was easy to sue the same #11 to trim the bricks to the desired shape. To fill in the vertical joints, I used a syringe with a blunt needle and loaded in some white glue. In no time the joints were filled in. The color of the bricks looked excellent, but I wanted a more natural stone appearance. I found that the bricks readily accept any paint and was pleased with the final appearance. Cool. I proceeded to mix up some asphalt as per the provided instructions on the package. What I got look remarkably like asphalt! I know what I’m talking about, I inspect this stuff as part of my real world job. I applied a thin coat and tried using a roller to smooth it out. As first I was not pleased, the surface was somewhat uneven and rough. Then I recalled that real asphalt that has been in place for some years looks very similar. It actually has a far more natural look than using, for instance, sand paper to simulate asphalt. Hudson & Allen’s product has more “life” to it. One caution here, when using water based material around the asphalt, it looks like you can re-soften it. Not a big problem if you exercise a little caution. Next, I tried the Muck. Pretty good stuff, this Muck. It is a fine reddish brown powder. Use it to splatter on vehicles or add a little texture and color to ground. Be a little careful, it does tend to get around. I also had a good patch of tall grass. It appears to be some sort of animal hide that is preserved with the hair on it. It makes an excellent looking tall grass, maybe a little too tall. I cut a patch of the skin off and trimmed the hair down. It lost its long tapering grass look and became a thick heavy reed. As my scene was to be in the late winter, early spring, I tried painting the dark green grass to look brown. I had a difficult time to get it to take color. I finally wound up giving it a heavy coat of white for a frosted look. I do believe the same product is available in tan, but I am using what was given for review and I still have to fit in snow and slush. Speaking of snow, that is what came next. It is a fine white powder with a nice looking sparkle and glint. I applied a thin coat of water thinned white glue to the area I wanted snow and began to early spring snow that comes and melts away. It looked good. Next came the slush. It is similar to the snow but with more coarse material in it making it resemble frozen and broken lumps of snow. Again using a base of white glue, I applied and built up several convincing layers and piles of slush. Now on to one of my favorite H&A products, Forest Litter. This is also a “natural” product composed of materials from plants. There are numerous small shapes that look like dried fallen leaves. More white glue, a little shaking and it just adds the right detail to bring a scene to life. Again, using a #11 you can place individual pieces here and there. Not only does this look good on the ground, but it can also be used to add a point of interest on a vehicle or to help build up camo nets or even, for the ambitious among us, a hedge or shrub. Last of my grab bad of products is the Evergreen boughs. These are again a natural material and do indeed look like evergreen boughs. Make your own trees, or hide your Panther from the dreaded Jabos. I have used Hudson and Allen products before. They have never disappointed me. All items come with detailed instructions on their use. Although the packages are small, each one contains more than you think. Their line keeps growing and I cannot wait to see what they come out with next. My thanks to Vatican for graciously supplying these products. |
|
Information, images, and all other items placed electronically on this site are the intellectual property of IPMS/USA ®. |