|
1/53
LOCKHEED ELECTRA 10 |
|
|
|
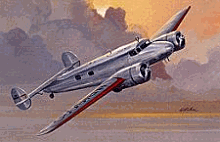
The kit comes in a sturdy box. Upon opening the box you will find two (2) plastic bags, a larger one containing the main components and a smaller one in which you will find the clear parts. There is a total of 64 white colored parts; 18 clear and two rubbers tires, approximately 18 inches of clear non-filament for the antenna wire. The box, also contains the decal sheet, Amelia Earhart’s aircraft registration, Williams Bros., Inc. new address, a credit’s sheet, the assembly instructions and two (2) small sheets. One explains the decal application and the other is to be used in case parts are missing from the kit. The assembly instruction prepares you for the possibility of having extra parts due to decisions the modeler have to make during assembly. The front, also shows the color scheme for each aircraft, as well as decal positions. The back or interior section of the assembly instructions contains eleven (11) steps sequence to build the kit. In some cases it tells you that the step may be eliminated but this is your decision. In addition information on how to build the kit, decal handling and application is provided at the bottom left/center section of the assembly instruction. The kit has raised detail. The front of the box has a beautiful painting of Earhart’s aircraft by O. Kuhni, while the back has a catalog of Williams Bros. kits. The three (3) versions consist of Amelia Earhart’s aircraft, a United States Coast Guard (USCG) and a Navy versions. I decided to build the Navy version. To see how the rubber tires look, I also decided to use them. The problems started when, I decided to do the interior of the aircraft. There is a bulkhead between the cockpit and the main cabin but there is none between the main cabin and the rear of the aircraft. I made one out of plastic stock. Then I found that the main cabin floor does not fit properly, again I used this as a rough sample and made another. As I tried to fit the fuselage halves, I found that there were no locators pins in any of the parts of the kit. This created a problem for alignment if you do not work carefully. The exhausts for the engines are blobs of plastic and do not look right, thus new ones were made of rod . The angle of the exhausts looks wrong but looking at some pictures, they are correct. The next item I tackled was the wings. I first glued the outer sections and put them aside to dry. This was a mistake. One set of wings did not dry correctly and I had to separate them. No locators pins!! I cut through one of the ailerons and a small section of the wing next to it. This is not a mayor problem as I fixed it with putty. By this time the floor and bulkheads on the fuselage were dried. I felt that there was no need of puttying the inside as very little can be viewed from the outside. The interior was detailed with the seats provided with the kit, seat belts and the compartment above the seats used to hold baggage. In the cockpit area I added arms rests to the pilot and copilot seats, as well as, the center console. I, also, added some detail to the center console and seat belts. In order to keep a good alignment I glued small strips of plastic to the inside of the fuselage and let them dry for 24 hrs. The interior was painted silver, the seats painted leather. The seat belts were made out of masking tape and glued in place. At this time I found, that although the plans show a control panel decal such item does not exist. I painted the control panel black and added silver, yellow, red and white dots and then I glued a clear plastic on top. This gave the control panel some depth and improved its looks. When I joined the two fuselage halves, I found that the floor by the entry door was a little too high. This was solved by pressing the floor against the fuselage and glued with Super. Glue. I found that I had to sand the floor to make it even. The two fuselage sides were painted prior to be glued. The area where some sanding was needed was hand painted afterwards. The engines were painted steel and a backing was added behind the engine block to cover the “Calcutta Hole” that is found behind the engines. This backing was painted black. The engines were detailed with cooper wire. I was disappointed as the wires did not stay glued. I, therefore took them from the engines. The rear tail plane and wings were added next. I found a separation between the tail assembly and the fuselage. This was corrected with filler and sanding The rubber tires’ centers were painted aluminum, and installed. I did not like the end result. My mistake. I tried to look for more information on the landing gear in order to improve it but was unable to find a suitable book at my local library. I did not pursue this, as I wanted to finish the model. Decals were added, as well as a coat of clear flat. I spent 24 hours building this kit. This includes the additions I made as well as the time I spent sanding, painting and solving the inconsistencies shown above. I enjoyed building the kit. I would like to thank Williams Bros. for the opportunity of reviewing this kit and hope that they bring more kits from this forgotten era of aviation. |
|
Information, images, and all
other items placed electronically on this site |