|
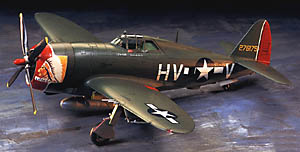
Tamiya Kit Number 60769 1/72 P-47D Thunderbolt ōRazorbackö |
|
Reviewed By Phil Pignataro, #17254 |
|
|
|
MSRP: $19.50 USD So as to not keep everyone in suspense, IÆll say right up front I think this is an outstanding kit! Overall, this kit features scribed panel lines, exquisite detail, very good fit, excellent clear parts, and very nice decals. You can build one of two different aircraft: one from the 8th AF or one from the 5th AF. Construction begins with the cockpit which is a little masterpiece in itself. The seven pieces fall together and with careful painting and weathering look extremely convincing. A very realistic looking seat belt/shoulder harness decal adds to the authenticity and makes this the best out-of-the-box cockpit IÆve seen in this scale. This entire assembly fits neatly between the fuselage halves. There is also a short wing spar in front of the cockpit tub that must be included before the fuselage is glued together. When I did some test fitting, I noticed you could see through the fuselage from the rear of the intercooler exhaust doors. I made two baffles from scrap plastic and glued them on the inside of the fuselage to solve this problem. After I glued the halves together, the only area that needed any filler was just under the turbo-supercharger exhaust hood fairing on the bottom of the fuselage. Superglue worked very well here. Next, the instructions call for work on the engine. Again, this assembly looks quite good with painting and weathering. The engine slips nicely into the cowling. I didnÆt glue the engine in at this point to facilitate masking for painting. Unlike other Thunderbolt kits in this scale, TamiyaÆs P-47 has a smartly engineered connection between the engine/cowling assembly and the fuselage which guarantees a solid fit. As a result, I left this component off until later after painting. Step 4 on the instruction sheet shows the wing assembly. Again, the fit is almost perfect with just a little sanding required on the wing panels to get them in place. A nice touch is an insert into the leading edge of each wing for the eight machine guns. The outer two guns on each wing are molded into the insert and there are two holes for the longer, inboard guns. As you would expect from Tamiya, the guns are correctly aligned horizontally to the ground. A curious omission on the model, however, is the two outer gun barrels have small holes on the ends while the separate inner gun barrels do not. I didnÆt realize this until I had glued all the guns in place and decided to simulate the barrel openings with paint rather than attempt to drill them out at this point. One more ōgotchyaö with the wings: make sure you open the locating holes for the rocket launchers and pylons before you glue the wings together. Even when holding the completed wings under a very bright light, I was unable to find the holes and had to estimate where the pylons went. Consequently, I did not use the rocket launchers. Here again, the wings as well as the horizontal stabilizers fit so well, I decided to leave them off until I completed painting the model. The landing gear struts, wheel wells, and gear doors are nicely detailed. All the doors have either locating pins or slots to insure the correct angle and positive attachment. The struts themselves have square tops that fit into square openings in the wheel well to achieve a strong connection at the proper angle. Rather than glue these on the model at this point, I waited until the painting was finished. TamiyaÆs attention to ōmodel engineeringö detail is also evident in the prop and external stores. There are two propellers, one for each version, and they each come in two pieces: one with two blades and the other with two blades and the spinner. Each blade set sits ninety degrees to the other and the fit is excellent. External stores consist of two, 500-pound bombs, two rocket launchers, and two 108-gallon drop tanks. Each of the drop tanks and the bombs have a tab which fits into a slot in the fuselage or the pylons -- a really nice feature for alignment. With the subassemblies complete, I was ready for painting and I chose Lt. EmrichÆs aircraft, ōSleepy Time Galö from the 58th FG. Masking the leading edges of the wings and the area below the horizontal stabilizer was easy since the model was not fully assembled. The instruction sheet indicates the vertical stabilizer and the lower portion of the engine cowling should be a very light gray instead of white. Checking Ernest R. McDowellÆs book, Thunderbolt: The Republic P-47 Thunderbolt in the Pacific Theater, I found two pictures of this particular aircraft on page 11 and I agree these areas donÆt appear to be white. I wasnÆt sure about the gray, though, and thought natural metal might be called for. Finally, I settled on light gray for the tail and aluminum for the cowling. IÆm sure some of our members could provide more information about this particular aircraft. When the various parts dried, I glued them together. The horizontal stabilizers went on fine, but I had to do a little sanding on the wing spar to get the wing to fit snugly against the fuselage. I also had to keep pressure on the wings while the liquid cement dried. Overall this ōassemble after paintingö process worked out as I hoped. It made painting this particular scheme easier and none of the seams required any touch-up. An application of clear gloss provided a base for the decals. As I mentioned earlier, the decals are quite nice. The ōSleepy Time Galö nose art looks more like a painting than a decal. There was no silvering on any of the decals, though they are slightly thick and showed minimum ōsnugglingö into panel lines even after two applications of GunzeÆs Mr. Mark Softer. Another gloss coat to seal the decals followed by a flat coat and a little weathering with pastels was all that was needed to complete the model. The canopy can be displayed in the open position so you can show off the cockpit detail. There are a couple of other things to watch out for during construction of this kit. Some of the pieces are delicate and require careful handling. I lost one of the navigation light covers and had to make a replacement out of clear epoxy. Also, I put a permanent crease in the pitot tube while attempting to remove it from the sprue, so I had to fashion a substitute. I thoroughly enjoyed building this model of my favorite WWII fighter and it turned out to be one of the best in my collection. Everything about this kit is top notch. It retails for $19.50 and you certainly get what you pay for. Without reservation, I highly recommend this kit. My thanks to John Noack for letting me review this model. Thanks also to Walt Fink and Steve Jahnke for their help with the photography. |
|
|
|
Information, images, and all other items placed electronically on this site are the intellectual property of IPMS/USA «. |
)