|
Pavla
Models 1/72 T-50 Bobcat |
||
|
Reviewed By Stephen Bierce, #35922 |
||
|
Click image to view full-size photo |
||
|
"But you'd better never bother with me ol'
bamboo..."--from the soundtrack of _Chitty Chitty Bang Bang_, lyrics by
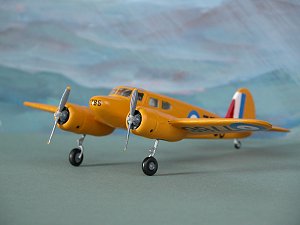
Richard and Robert Sherman. Before I get into the kit itself, I should provide a "whazzit": the T-50 was a milestone in the history of the Cessna company, their first production twin-engine airplane and an attempt to compete with planes like the Lockheed 10 Electra for the short-haul "feeder liner" market. Although planned for civilian use, the Bobcat was more successful in a military role brought on by the arms buildup to World War Two--as a trainer for teaching crewmen to fly the new medium and heavy bombers entering service. Cessna built over 3000 T-50s in various subtypes for the U.S. Army, the U.S. Navy and the Royal Canadian Air Force, and thousands of airmen learned the realities of multi-engine flight in Bobcats before moving on to Flying Fortresses, Liberators, Halifaxes, Catalinas, Mosquitoes, Lancasters, Marauders, Mitchells and other "big ships". The Bobcat (designated the AT-8, AT-17, UC-78, JRC-1 or Crane depending on which military service it flew for and which role) was universally nicknamed the "Bamboo Bomber" due to its combined wood/steel tube structure and the fact it looked like an embryonic Boeing B-17 with its low-wing configuration and rounded shapes. It's not known whether Bobcats were ever used in an actual combat situation--they certainly weren't designed to carry weapons and were so underpowered that carrying a worthwhile ordnance load would have been impossible--but they did see service around the world as "hack" utility transports assigned to combat air units. The irony of the Bobcat's history is that in spite of its important (if unsung) service during the war, its only fame came years later. When a popular radio drama about a flying cowboy was set to be re-launched on that brand new medium _television_ in the 1950s, all of a sudden _Sky King_ of the Flying Crown Ranch needed a very important piece of hardware--an airplane! An army surplus UC-78 fit the bill, and became "Songbird" for the first season of _Sky King_'s video adventures, eventually being replaced by a brand new Cessna provided by the factory. (The original "Songbird" still exists, albeit as a pile of parts at an airfield in Clinton, Missouri.) Many other surplus Bobcats, especially ex-RCAF Cessna Cranes, became bush planes...some on seaplane floats! A few Bobcats are still flying today, and several are in museum collections. |
||
|
Click image to view full-size photo |
||
|
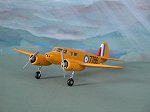
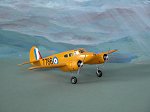
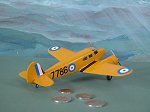
Pavla's kit is a reissue from 1999. I haven't done many "limited release" models, but as I worked on this one, I said to myself, "I've built worse kits." And to tell the truth, I have. The model is a bizarre combination of top-notch photo etch, very fine resin castings for the engines, adequate vacu-formed clear parts...and practically 1950s tech-level molding for the main parts sprue. Add to that crude assembly drawings and Czech-lish instructions and I knew I was in for a bumpy ride. Getting parts to align properly was the main challenge of assembling this model. The fuselage and the engine nacelles in particular needed a lot of fiddling and small modifications. By the time I fitted the nacelles to the wings, I realized the photo etch engine "firewalls" couldn't possibly fit where they were supposed to. So I fabricated firewalls from scrapped credit cards. For the sake of getting this model done, I omitted most of the photo etch parts. I looted the front seats and control columns from a wrecked bomber model, and excluded the rear bench seat parts (3 and 4) because they were short-molded and because the front seats blocked the view of the aft cabin so much. While I think the photo etch instrument panel is amazing work, I decided it belonged in another model and instead painted the backside of the photographic instruments sheet (part F) white, Elmer's Gluing it to the plastic dashboard bulkhead (part 9). (Frankly, at my middling level of expertise, I doubt I could paint the brass instrument panel in a fashion to do it justice!) I painted the interior zinc chromate green, and the seats light gray. I used the kit's vacu-formed windows, though I did mull over using liquid clear acrylic for the job. A nasty surprise came with adding the engines. The instruction sheet goofed as to what portion of the resin to leave attached to the backside of the engine...so I ended up cutting too much and having to replace the engine mounts, which I did with pieces of Evergreen tubing. Instead of drilling large holes in the engines to accommodate the molded plastic shafts on the prop hubs (parts 17), I drilled smaller holes and installed metal shafts from behind using cut-down flathead pins. Then I cut the plastic shafts off the prop hubs, drilled holes in the hubs, and attached the hubs to the metal shafts. This way, I could have props that turn. To be sure of the alignment, I put a cowl together using Scotch tape, and used it as a guide for gluing the completed engines onto the firewalls. (A side note about the propellers: while the "metal" type props included in the kit are correct for nearly all UC-78s and JRCs, early AT-17s, some Cranes and all AT-8s had wooden props [and so did many civilianized surplus Bobcats]. The AT-8 also differed from all other Bobcat models by having Lycoming engines instead of the Jacobs ones represented in this kit.) The cowl halves were all badly misshapen and fit poorly over the engines. The exhaust pipe parts were all short-molded so instead of using them, I simply painted fake pipes on the cowlings after the color coat. Another shortcoming of the instructions was the need to drill holes in the wing underside (part 8) inside the nacelle areas to provide sockets for the landing gear legs (parts 19). It would have been nice if Pavla at least marked part 8 with the locations of the sockets. Each landing gear leg is supposed to have three support arms attached to it--but these parts are not included in the kit and must be created from stretched sprue or other materials. Pavla doesn't even give dimensions for these parts, forcing the modeler to do some trial-and-error. If you want to pose the wheels up for a flying aircraft, the option isn't given in the instructions and you'll have to figure that configuration yourself. The landing gear legs are weak (I wish there had been the option to replace them with white metal pieces!) and one of them broke as I was installing a shock-absorber hinge. The main wheels were molded somewhat out of alignment and needed some care too. Fitting the wings to the fuselage was tricky, and I'm not totally satisfied with the result. I succeeded in making the wings nice and level, but there were gaps both at the wing roots and under the fuselage. I filled the gaps as best I could with Super Glue. The horizontal stabilizers fit a little better, but I would have liked to see separate elevator parts, as on parked Bobcats the lock on the control wheel kilters the elevator up (and it _is_ noticeable). There are three marking schemes put forth in this kit: a UC-78 hack flown by the Headquarters Squadron of the 8th Air Force at Bovington, circa 1942-43; a late wartime JRC-1 trainer from NAS Pensacola (just replace the orange trim with insignia green and you have the markings for the Bobcat in the National Museum of Naval Aviation in Pensacola); the Cessna Crane belonging to the Canadian Warplane Heritage collection, restored to flight in the latter 1980s. After entertaining the idea a certain civvy paint scheme (and I think you know just which one I mean), I chose the bright yellow RCAF Crane...and soon remembered why I rarely paint anything yellow. For me, yellow is a particularly difficult color to work with and this model wasn't immune to the difficulty. I used Testors Model Master enamel flat yellow...perhaps I should have gone with an acrylic instead. I'm definitely not pleased with how it came out. The scribed lines for the control surface part lines, the door and the cargo hatch are all thin and shallow and got lost under the paint, so I feel I should have re-scribed them before and during assembly. The decal sheet (my sample came with two copies) is for the most part adequate. The decals take a little longer time to activate than usual, but are plenty opaque and stick fairly well. One problem area with mine was the application of the fin flashes, which didn't conform to the lower area of the vertical stabilizer, where it met the fuselage and the horizontal stabilizer. The wing roundels are the wrong type for the actual CWH plane, so instead of modeling that one specifically, I used the serial numbers on the extra sheet to change Aircraft Number _7862_ to _7786_. I was very grateful for the extra sheet, as the roundel on the underside starboard wing wrinkled badly while drying and I had to replace it. Another difference between the CWH plane and the model is the configuration of the windows above the windshield...the real plane has 3 smaller windows instead of the four "greenhouse" windows of the model kit. The kit's "glass" is still correct for most Bobcats, though. It fit a little better than I expected, this being the first time I've tried a vacu-formed windshield of this kind. Final verdict? This is a demanding and unforgiving model but one that an expert could probably do better with than I did. I do not recommend it at all to novice builders, for whom the fit problems would be a real headache. The only thing that makes the Bobcat worthwhile as a "step-up" project for those who have mastered mainstream plastic airplane models is its small size and relatively few parts. I grade this kit a C- (a straight C if you like using photo etch). What would raise it to C+ in my book would be if there were extra variant-specific parts, like the aforementioned "wooden" props and alternative windshield...and definitely clearer instructions with more attention to detail. Would I build another of these? Maybe...if I can get decals for "Songbird" and somebody can tell what color the plane was really painted! (It _was_ black-and-white TV, after all.) Thanks to Pavla, John Noack, and IPMS/USA for the review kit. |
||
|
Information, images, and all other items placed electronically on this site are the intellectual property of IPMS/USA ®. |
||


