|
Marsh Models Kit Number AT72001 1/72 Focke Wulf Ta 183 |
|
|
Reviewed By Paul Bradley, #35554 |
|
|
|
|
|
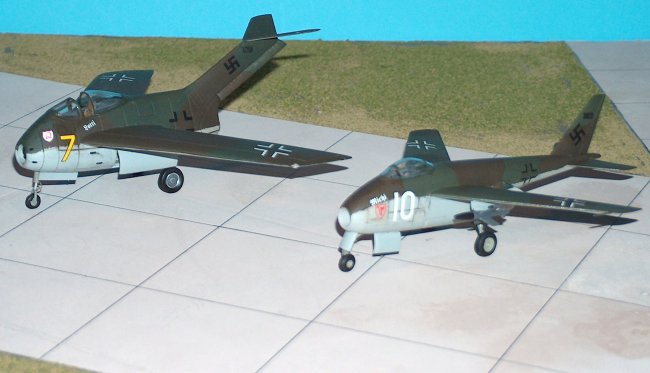
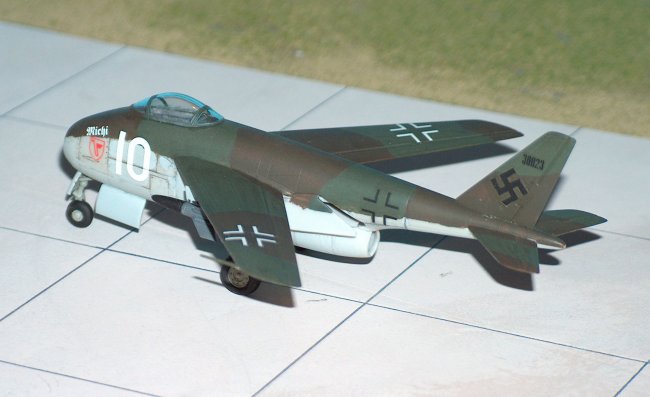
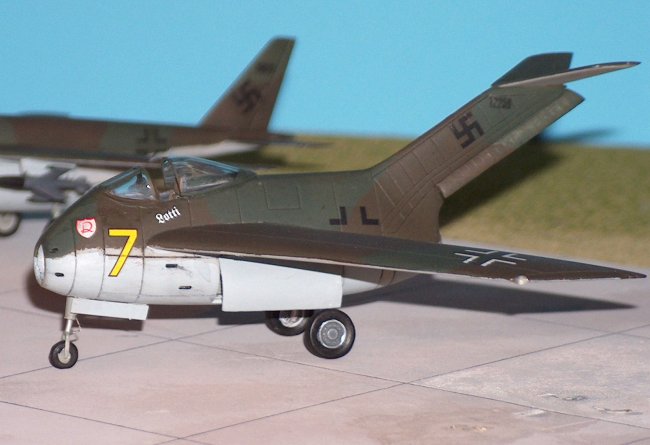
MSRP: 32.95 GBP Neubiburg Airfield, near Munich, March 18, 1946. It was a beautiful spring morning; one could hear birds singing in the trees surrounding the airfield. However, Oblt. Hermann Baumgartner had other things on his mind. His “blackmen” had been telling him of the latest rumors coming from the StalagLuft down the road. According to one of the guards, who had been talking to the American prisoners-of-war, the war was not going as well as the Fuhrer was leading them to believe. According to this source, the Americans were on the point of invading the Japanese mainland, and once they had finished off the Japanese, Germany would be next. Two years ought to be enough time for the Allies to recover from their storm-plagued debacle on the Normandy beaches, and there were also rumors of a new American terror weapon of tremendous power. Well, that was what they had also said about the V1 and V2, but the Allies had bombed those programs into dust! At least the aircraft factories were underground now. More disturbing were the rumors that the Soviets were on the point of recapturing Moscow, 4 years after its fall. That would probably be the turning point in what had become a war of attrition on the Eastern Front. He shuddered at the thought of his tour of duty on that front – the Russians could be ruthless. At least Baumgartner now had the luxury of serving with one of the premiere air defense units in Germany, II/JG2. And they had just finished converting to the new Focke-Wulf Ta183 jet fighter! What an exciting aircraft; 800 km/h and guided missiles! Just in time, too; rumor also had it that the Americans were about to start a renewed bombing campaign against the Reich, with their big new B-29 bombers. “Well, bring them on, we’ll be ready,” he thought. “We’ll let our brothers in I/JG3 take on the fighters with their nimble P1101’s and we’ll take out the bombers.” He looked to the skies. It was a beautiful spring morning; the birds were singing, and Oblt. Hermann Baumgartner stopped to take it all in… Introduction I admit I used to dislike the so-called “Luftwaffe ’46” kits – why kit an imaginary aircraft when so many real aircraft have never been kitted, I would grumble. But you know what? I had missed the point entirely. These kits are FUN! What could appeal more to the little boy in us all than using your imagination to finish a model, to not have to worry about total accuracy, and to invent a background history to place it into context? To me, it’s getting back to the time when I could finish a model in a day and be happy with the results. Now it takes me forever to finish a kit and its not always fun. And when a hobby is no longer fun, why do we bother? When this kit was offered for review, I decided to have a bit of fun. I had just finished the book “What If” that offers alternative histories including what could have happened during World War II. The result is the little story above, which is plausible given a few major variables. Tucked away, I had a kit of the DML/Dragon Messerschmitt P1101, bought for a song at a hobby store-closing sale some years ago. Why not invent a scenario with the two aircraft and build them together for a small diorama? The Kits The impetus behind this little project is the new Ta183 by Marsh Models of Sussex in England. Not familiar with the name? Well, this is their first airplane model, but they have been purveyors of quality racecar kits for years. Their new line of aircraft is released under the brand name “Aerotech” and future releases will include the Arado E.555-10, Gotha P.60A and a Lippisch delta, so it looks like their early line will concentrate on Luftwaffe 46 projects. Visit their website at www.marshmodels.com for more details of this and future releases. This multi-media kit comes in a sturdy top-opening box with a small photo of a completed model on the end. Inside, there are four Ziploc baggies containing the parts. The first holds the major airframe parts, hollow cast in dark gray resin. At first, I thought this was plastic, the quality of the resin is so good; there are no pinholes, pockmarks or swirling, nor the heavy pour stubs that you normally associate with resin kits; this is a good start! There are pour stubs, but no heavier than with limited run plastic kits, and they are easy to remove with side nippers as the resin is quite soft. Also, the resin has a little pebbliness to the surface, but this is no worse than a limited run plastic kit and is easy to knock down with a fine sanding stick while giving the parts their obligatory clean up. Panel lines are finely engraved. Overall, the parts clean up very nicely. The second bag contains some smaller detail parts, also in resin, and these are to the same quality as the main airframe parts. The third bag contains a myriad of white metal parts, 30 in all, all crisply cast with minimal flash, seam lines (the bane of modelers everywhere!) or pour stubs. These include the undercarriage, jet pipe, seat, and four Ruhrstahl X-4 missile bodies. The two photo etch frets contain a total of about 80 parts, produced to a high degree of quality and detail. These include four sets of wings and stabilizing fins for the missiles, a full set of seat harnesses and an instrument panel. Also included are a small acetate backing for the instrument panel, two vacuform canopies, and two small sheets with constructions diagrams and color and marking details. Rounding out the contents is a nicely produced decal sheet. DML’s P1101 has been available for some years and is a nice little kit. Unlike the Ta183, the real P1101 was actually being built and was 80% complete when captured by the Americans, so you do have to pay a little more attention to detail with this kit than with most Luftwaffe ’46 kits! But we all know how aircraft can change from prototype to service, so there was some latitude for me to take when making the model. As this kit is not the focus of the review, I will skip the details and say that it builds fairly easily and looks the part. I painted the model in an 81/82/76 scheme and gave the aircraft fictitious markings based on JG2 - who’s to say I am incorrect? |
|
|
|
|
|
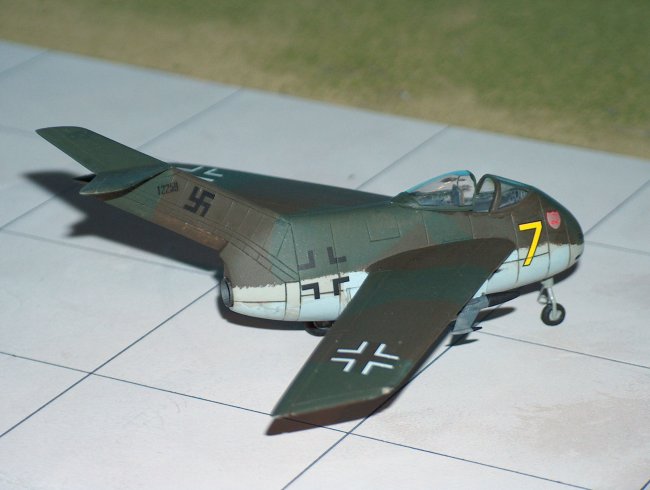
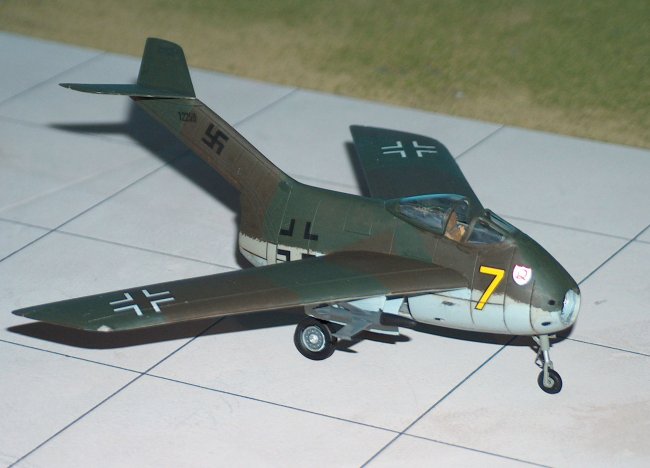
Building the Ta183 Construction commences with the cockpit. To a resin tub are attached a nice white metal seat, replete with etched metal harness; the stick; etched metal rudder pedals; and etched metal sidewalls. The instrument panel is in three parts. The back includes the coaming and is made of white metal; this will help balance the model on its wheels! I painted the front surface in white, and then used Future to attach an acetate film of the instrument faces. Finally, an etched metal panel front was attached. The whole looks very effective when painted. This was then superglued to the tub. While test fitting the fuselage halves, I noticed that the coaming fouled the fit, so this was filed back to allow the two halves to come together. Before the fuselage was glued together, there were a number of parts to add. The wheel wells are prominent in the rear fuselage and these are large resin inserts. Care will need to be taken to get these aligned properly and there is some trimming to do in this area. To the extreme nose, a white metal intake is added. This is rather shallow and the dedicated may wish to ream it out, or replace it with a piece of tubing. You may also elect to paint the front surface red and pretend it is an intake cover! Behind and below this is the front undercarriage well, a simple resin piece. All these were superglued into place then the fuselage halves glued together. There is a little cleaning up of join lines, especially around the nose, but nothing that a little filling and sanding can’t take care of. I think most of the problem is in the way I cleaned up the parts – if you don’t keep the resin flat on the sandpaper, you can end up taking off a little too much resin. Into the rear fuselage is inserted a white metal jet pipe representing the back end of the He S 011 jet engine. At this point, I was very concerned about tail sitting, there being very little space up front to add extra weight, so I omitted this piece in favor of a length of plastic tubing of the right diameter. On my kit, the tail was slightly warped to starboard, but a dunking in hot water followed by careful bending and a dip in cold water resolved this. The horizontal tail planes are a one-piece resin part that fits easily onto the fin top. The rudder is a separate piece and I cemented it a little off center for effect. The wings were also a bit warped, so I straightened them too. Looking at plans for the Ta183, there is no anhedral on the wings as you might expect, so be careful attaching them to the fuselage. The pylons for the X-4 missiles are done in etched metal. I felt them to be a little too delicate, so I replaced them with extra pylons from the P1101 kit; I decided that two missiles per aircraft were probably as many as one pilot would wish to deal with – don’t forget that the X-4 was wire-guided with constant input required from the pilot! Turning to the missiles, these are nicely cast in white metal with all the fins in etched steel. The problem is that, according to the dimensions listed on the luft46.com website, they are too short and too slim. Remember that the X-4 was a real missile and there are surviving examples in museums around the world, so I can’t really compromise with this part of the model! It was a shame to have to replace them with plastic ones from the DML kit. The undercarriage was next. The main gear legs are fine, and fit snugly into their wheel bays, however, the nose leg is cast in two parts and I do not think that this will be a very strong join. The hub detail is nice, but I didn’t really like the white metal wheels; they are cast from a split mold and it was slightly off center when my examples were done. I replaced them with likely looking wheels from my spares box and added the etched steel hub detail from the kit. The nose wheel is also mis-cast, so that was also replaced. Lastly, I needed to add the canopy. As I mentioned earlier, there are two vacuform canopies, but unfortunately they are a little narrow for the opening in the fuselage. I tried to rectify this by gluing the front with superglue, then squashing the canopy by pushing the back toward the front. This looked a little odd, so I tried cutting the second canopy a bit bigger – unfortunately this really showed up the mold line from the master, so that didn’t work either! I ended up searching through my spares box for an injection molded replacement and found that the old Airfix Harrier has a canopy that, with a little modification, fits very well, so this is what I used. With any luck, Squadron will do a replacement, or maybe the PM/Revell kit canopy fits? Finishing Being a “paper airplane’ there are no true color schemes, so you can do anything you fancy! I opted for the 81/82/76 finish recommended by Marsh Models, it being very plausible, except that I did mine “freehand” rather than use sharp demarcation lines. For a change, I hand painted the model, just to prove I can still do it! The model was coated with Future, and then decaling commenced. I have to say that the decals are an absolute joy, being slightly glossy, thin, perfectly registered and easy to handle. The sheet is printed by Zanchetti in Italy and they are first-rate. There is a fine selection of unit badges, werknummern, codes numbers and national markings, including a set of “Stars and Bars” for those who specialize in captured aircraft! A nice touch is a selection of girl’s names so you can name your pilot’s girlfriend! The sole problem I had was that the images on the extreme left side of the sheet wouldn’t release. Unfortunately, this included one of each of the unit badges! These were easily replaced by examples from the spares box, but I hope this was an isolated case. Otherwise, the decals released quickly, settled down very well over the detail and needed no setting solution. A further coat of Future to seal the decals in, then an airbrushed coat of Testor’s Dullcote, and the model was finished. It looks very menacing when complete and is a nice contrast to its’ almost-contemporary, the DH Vampire, an aircraft that would have had a hard time competing with the Ta183 if the projected performance figures are anything to go by! Conclusion Not a kit for the faint-hearted, this requires some previous experience with true multi-media kits. I had some warping problems that may frustrate the less experienced, there was some extra cleaning up to do at joins because of some excess resin, and of course, I had problems with the canopy. Having said that, the parts are very nicely detailed and if you take your time your efforts will be rewarded with a fine model. I haven’t seen an example of the Revell/PM kit, so I can’t comment on the accuracy of that kit. However, given the poor quality of other PM releases, I should think that the Marsh Models kit will win hands down! Whether you feel that this kit is worth the price is entirely up to you. In terms of quality of the parts and ease of construction, it is very good for a multi-media kit, though short of the modern injection molded kit. If you want a good quality Ta183 in 1/72 and have experience with multi-media kits, I recommend you buy it! Where to Buy The Ta183 is not currently available in the US, but can be ordered directly from Marsh Models. John at the company has generously offered IPMS members a discount price of GB Pounds 29.50 (about $45), a big saving on the regular price! This also includes postage. Just refer to IPMS/USA when ordering. Their preferred method of payment is by major credit card (but NOT American Express), and you may order directly from the workshop at: Marsh Models Old Stable Studio Court Lodge Farm Wartling Hailsham East Sussex, BN27 1RY England. You may also contact them by e-mail, via their website at www.marshmodels.com. My sincere thanks to John at Marsh Models for supplying the review sample, and for their discount offer. |
|
|
|
|
|
Information, images, and all other items placed electronically on this site are the intellectual property of IPMS/USA ®. |
|