|
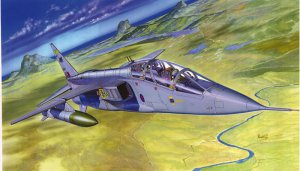
Italeri 1/72 Jaguar T.2 |
|
|
Kit Number 1251 |
|
|
Reviewed By Jim Pearsall, #2209 |
|
|
|
|
|
MSRP: $19.00 USD Thanks to Italeri for providing this nice kit to review. The Aircraft: The Jaguar is a joint British/French project from the 1980s. It has done yeoman service for the RAF and Armée de l'Air as a tactical fighter. The RAF has plans to replace Jaguars with Eurofighters, but as the delivery date of the Eurofighter seems to continually move into the future, the Jaguar will remain as a viable weapons system. In order to keep proficiency and aid transition to the type, the RAF has T.2 trainer versions assigned to squadrons. The RAF bought 38 Jaguar T.2s. The type is not considered combat capable, as it carries only 1 cannon, does not have the RWR of the fighter version, and does not carry the air-to-air refueling probe. I’ve done several other “two seaters from fighters”, and many of them just don’t look right. The Jaguar T.2, however, actually looks slicker than the single seater. Probably the extra length forward, and a more rounded canopy. |
|
|
|
|
|
The Model:
Two large sprues of parts, clear parts (canopy sections and gunsight,
nicely packed in a separate plastic bag to protect from scratches) decals,
and a large instruction sheet. Sprue A shares some parts with the Jaguar
GR.1 version, so there are some weapons, a vertical stabilizer, etc which
are not used on the T.2. The parts are flash free, engraved panel lines,
and no sink holes. All in all, a state of the art model for the middle
2000s. There are markings for 3 RAF T.2s, in the green/grey, Gulf pink
and all grey schemes. Construction: The kit is fairly conventional. Because the mold is expected to support both the single and two seat versions, the fuselage splits just forward of the wing. The fuselage front is split left and right. The high wing is a single assembly of both wings and the fuselage top. Kudos to Italeri for the way this part comes off the sprue. The main gates come in at the wing roots, so the clean up of the attachment point is neater. The other point is at the wing tip, but it’s petite, and easily fixed. I really appreciate it when the mold designer comes up with something to make my life easier. Then there’s the bottom of the fuselage. I must have muttered “What were they thinkin’?” a dozen times. The rear of the fuselage is 3 pieces, left, right and bottom. There is no alignment assistance for the bottom piece. I worked pretty hard to get it in good alignment, but it still required a goodly amount of Dr. Microtools red putty to get rid of the ridge. One saving grace is that the lower edges of the air brake wells run along the edge of the part. |
|
|
|
|
|
The vertical stabilizer is provided as a separate part. I wasn’t reading
the instructions carefully, and installed the part from sprue A. When I
started to install the two horizontal “winglets” on the vertical stab,
something really looked wrong. And I it got wrong. The 2 seater doesn’t
have the highly visible RWR found on the single seater. I discovered the
correct part wedged into the crevice between the end of the box and one of
the flaps. It had come off the sprue at some time during shipment. Sure
glad I used Tenax instead of CA to attach the part. I didn’t miss the
fact that there’s only one gun (port side) and a blank piece on the
right. The starboard gun part is supplied, but isn’t used. I tried something a little different on this aircraft. There are black leading edges on all the surfaces. Rather than mask and paint them, I used a permanent black marker, and drew them on. This was fine, but I should have put a coat of Future on immediately, as the ink came off during handling for decals. |
|
|
|
|
|
The rest of the
assembly was standard. Everything fit pretty nicely. The air brakes were
particularly good, as they have small slotted holes which were cleanly
molded. Since the paint job is one of those “put the airbrush on wide”
schemes, I put the canopies on with Elmer’s and masked them in place.
After painting, I applied the decals. The decals fit cleanly, went on
with no muss or fuss. There seems to be a visible difference between the
size of the tail code as shown on the back of the box and the decal. Then I did the landing gear, drop tanks and gear doors. The under wing fuel tanks had a big gap in the “dog leg” where the split between top and bottom halves moves from the center line to the fins. Easy to fill, and I suppose it has something to do with making the mold. The tires were OK, but every one had a pair of holes in one side which appeared to be ejector pin marks. Easily fixed, but by the time I’m getting to the gear, the finish line is in sight, and I want to FINISH this thing so I can show it off. Then another small project. The canopies didn’t line up as nicely as I wished. This wasn’t as evident before painting, but showed up as a step at the back of the front canopy. OK, easy fix. Cut the Elmer’s loose, open the canopies, and re-glue in the open configuration. Sure glad I did some interior work. Overall Assessment This kit has a few flaws, but it certainly goes together well, and has more detail and better lines than the Airfix Jaguar GR.1 I did (mumble) years ago. I’m sure someone is coming out with aftermarket decals for this kit, as the Jaguar is used by a number of interesting air forces, including the Sultan of Oman’s Air Force, France, India, Ecuador and Nigeria. It’s a slick looking airplane, and I’m glad to add it to my collection. Thanks to John Noack for the opportunity to build this kit. |
|
|
|
|
|
Information, images, and all other items placed electronically on this site are the intellectual property of IPMS/USA ®. |
|
)
)
)
)
)