|
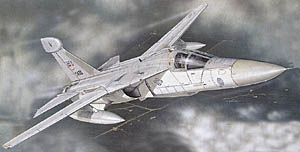
Italeri 1/72 EF-111A "Raven" |
|
|
Kit Number 1235 |
|
|
Reviewed By Ned Ricks, #36013 |
|
|
|
|
|
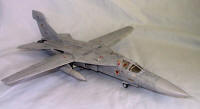
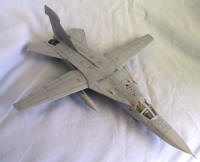
MSRP: $24.00 USD The EF-111A Ravens, known affectionately as "Fat Tails" and "Spark Varks," (the F-111 fighter version is known as the "Aardvark") have served as tactical electronic jamming aircraft since the 1980s. This is a big aircraft that started out as a really big “fighter” at a maximum wingspan of 63 feet, it is only about four feet less than a World War II B-25. I build mostly figures, so I am not an “engineer” who measures the angle of attack of the wing or who knows the exact cross section of fuselage and changes the kit to match blueprints. After recently trying to do a good job on a limited run airplane kit and then a supposedly new one (actually a re-issue of a 1980s version), I was expecting problems when I opened the box. I was pleasantly surprised. Fit problems were not present in this kit. This model was built Out of the Box, and if you see flaws in the photos (and there are some) it is my fault as the builder, not the kit. The kit box holds three gray plastic sprues (60+ parts) and one clear (5 parts). The molding has produced nicely engraved panel lines that make applying a wash to bring them out a worthwhile endeavor. The virtually flash free plastic was workable, and not brittle or soft. The gray plastic shade almost coincides with the paint colors for the EF-111. I had to pay attention to that when I was masking. The clear parts look very clean when dipped in Future. There is an instruction sheet of eight well-illustrated pages. The drawings were very clear as to part placement. The manufacturer even reminded me to put weight in the nose for this tricycle-gear model. I had some old lead shot from my shotgun days and put it inside with a glob of superglue to hold it. On step 1, make sure you get the cockpit tub on top of the guiding rails on the inside of the fuselage half. If your part is inside that rail, the halves don’t fit together as they should, which throws off the fit of that sub-assembly to the rest of the aircraft body and the canopy will not fit snugly in step nine. The parts for wings are very well fitted. I almost couldn’t take them apart after dry fitting. You will find no leading edge seam to sand as it was built into the part! Variable aspect wing placement swing-wing allows changeable wing angle. Sweep them back for a better fit into your display case or out for proper landing and takeoff configuration. When they are swept forward, there is a visible opening right through the fuselage. I am not sure how you would block that and still be able to re-configure the wing angle. When you open holes in the fuselage for small canards or antenna, like in step six for parts 5c and 6c, check to be sure that the hole is the right shape. I drilled out a round hole only to find that the part had a square-ish plug on it. Also, note that parts 15 and 16 as components of the air intakes, left and right sides, have a ridge molded to the back, unseen, side. Trying to be a good modeler, I sanded this off to get a snug, flush fit. Oops. Photos of the actual aircraft show that this section of the plane actually has a gap. The Italeri folks had accurately portrayed that by having the ridge for stand-off, and I over zealously sanded it off. So, a bit of styrene strip was glued to the back of the part to replace what I had removed. Parts 7b and 8b are the rest of that scoop assembly and there is another opening engineered into the model which is supposed to be there. In step 8, be sure to place part 27b and 21b before putting the main landing gear assembly into place. It is a devil of a thing to try to reach around to position them into the landing gear bay. Guess how I know! The windshield canopy can be posed open. I did not. While the provided cockpit interior was OK, it was basic, with decal seat harnesses. A decal is provided for the instrument panel. If you use the Verlinden or other after market upgrades, you can leave the two “hatches” open so your work can be admired. Painting instructions are provided for both Model Master enamels and acrylics. The upper wing surfaces were painted in Model Master enamel, FS 36320 “Dark Ghost Gray (Flat)” and the lower areas were FS 36375 enamel “Light Ghost Gray (Flat)”, as per the instructions. The diagram specified that the leading edge of the vertical stabilizer was also the lighter shade. The results of theses instructions you see in the photographs. There wasn’t much contrast between the shades, and the photos appear to show a plane all in one shade. If I were doing it over again, I might enhance the paint contrast to make a more pleasing difference, even though photos of the actual planes are in similar shades of gray. Decals are provided to show two different aircraft of the 27th Tactical Fighter Wing and the 388th TFW. The colors of the decals seem about right, and even the many small details, such as “Do not paint,” “No step,” and so forth, were clear and crisp. Since there were over 30 to apply on this plane, it was great that these were easy to work with. They slid off of the paper very nicely with the few drops of Windex I added to the water. These well-made decals snuggled down nicely to the plastic and even formed themselves into some of the panel lines. When I ran a dark wash to accentuate those panel lines, the paint was visibly over the decals. Thanks to the folks at Testors and Italeri for providing this kit to IPMS for review. Even though I am not usually an airplane builder, let alone a jet airplane, I had fun while making this model. I think it is a “good modeling buy” for the enjoyment of working with the product. |
|
|
Information, images, and all other items placed electronically on this site are the intellectual property of IPMS/USA ®. |
|


