|
Hasegawa 1/72 Lancaster B Mk1 |
|
|
Kit Number E23 |
|
|
Reviewed By Bob LaBouy, #3064 |
|
|
|
|
|
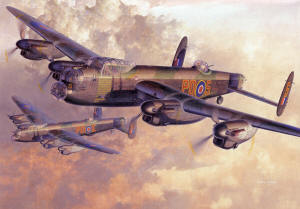
MSRP: $60.00 USD Kit Observations: One of my initial objectives in building this kit was easily recognized when the model was completed: it was constructed “out of the box” with kit decals. My only concessions toward “super detailing” are a few small pieces of lead tape to act as seat belts. The box art is extremely attractive and almost worth the “price of admission” in itself. My first small observation: while a beautiful rendering, from my reading and stories I heard from Lancaster pilots, a daylight scene such as depicted would have been most unusual: these aircraft were painted in their largely black schemes because they were almost entirely flown at night, not during daylight missions seen in the box art scene. I suspect the scene was chosen because of the difficulty of displaying the “S for Sugar” aircraft in a typical nocturnal scene possibly lit from the underneath by enemy searchlights. I initially began to pant awaiting this kit, in large part because of its importance to the Allied effort and it is another important part of the Godly scale. Instruction Sheet: There are six pages of reasonably easy to follow instructions, though they contain a few errors, some inaccurate drawing details. I also found the various marks that could be built from this kit to be a bit confusing, which is not helped by either the very brief narrative or the overall marking/color diagram which also contains at least one error. One example that jumps out at me is the illustration in the sheet showing what appears to me to be a pitot tube share shown on the instructions to be applied to each wing top surface near the trailing edge. You will quickly see there are two attachment holes on the wing tops. If you compare the pitot shaped device numbers from the instruction sheet to the appropriate number parts on the actual sprue trees, they are actually a mechanical aileron actuator device (my word, having no idea what they are really called in real life). The parts fit in place and while looking a bit weird (as do many other aspects of British aeronautical designs and features), but had you gone ahead and inserted the pitot tubes (which are contained on the parts trees); you’d quickly find the drawings had given you a bum steer (as they say in Montana). Hopefully the two small graphics below will help convey this type of confusing instruction drawing. Another complaint is there isn’t any reference to which or what types of antennae were fitted to either of the Lancasters portrayed in this box. Since there were many different antennae commonly displayed throughout the life of the Lancaster, one is free to pick and choose, but some initial heading or reference would be useful – at least to me. I am still disappointed that Hasegawa hasn’t yet taken the time to provide commonly used paint manufacturers color references, aside from one Japanese company. The instructions aren’t useless, but certainly could benefit from more proof work prior to printing and inclusion in the completed boxes. Kit: Overall the quality of the kit, its moldings and surface detail is quite high though I encountered a few mold “push marks” (mostly in areas which will not show normally). The kit provides approximately 220 parts on approximately 21 sprue trees, which also a number of very small parts, some of which were apparently whisked away by aliens from modeling desk. There are sufficient unused parts to quickly indicate that Hasegawa has plans to release at least one or more variants of the “Lanc” down the road. The recent announcement of the “Damn Busters” version confirms this and I fully anticipate one equipped with the famous “Tall Boy” bomb as well. My kit has a couple of small “sink” marks as well along the top sides of the fuselage; I saw them as small and probably not too great a distraction and left them alone. At least one of our members, Don McBean, says his model’s sink marks were severe and required filling. One again though, this is a shame, especially when one considers the cost of this kit. The fit and arrangement of some of these parts (in my judgment) leaves a lot to be desired. I was plagued with the many small side windows, which even with very careful trimming seemed to not always fit exactly to the intended fuselage hole and there are at least three sizes of these tiny windows – a fact which isn’t easily apparent until they are carefully laid out and can be seen side by side. Careful placement and arrangement of these 26 windows is best well thought out before adhering them to the fuselage, which allowed me two left over windowpanes. These little tiny windows also should be carefully painted along their edges to avoid the issue of “side lighting” when they are finally assembled to the fuselage sides. I failed to do this and regret my oversight/laziness in this essential step. A final comment about these tiny side windows: they are of three sizes which may not be noticeable to the naked eye (I am not sure about the “clothed eye” ?). I strongly recommend laying them out and arranging them by size in a vertical column. They fit the window openings pretty well, but I strongly recommend you dry fit them to insure you have them in the correct openings. Should you put one of the smaller windows in a larger opening, you’ll soon learn of your error, when you then seem to have a window that is a bit larger than the remaining window opening. Should you miss step in this daunting little task, you soon be SOL (and that doesn’t really mean situation out of luck), if you get my drift. The Lancaster has a good deal of clear canopy and turret detail, which is one of the major identifying features of this large bomber and also one of the daunting tasks in building this kit. While the parts, carefully trimmed, all fit together well, combining them requires very careful application of glue. I had several challenges and put mine together with the Testor’s Clear Parts Cement, which is an excellent addition to the modeler’s essential tool kit in my opinion. When I had completed my model, it looks “o.k.” but is clearly not “competition grade.” Some further advice about the turrets. Each is comprised of several clear pieces, which require a minutes study, very careful separation from the clear sprue trees, even more careful trimming and then dry-fitting. Once you paint and install the guns and bases, the inside of the turrets are inaccessible and subject to some potential problems, since the gun inlets are still open to what I call “blow by” spraying or other debris. I attempt to solve this by wetting (with water) and stuffing little pieces of Kleenex into those holes, which blocks these inlets to “crud” getting into the turret and is easily picked out or removed with a tweezer after the turret is fully painted and over-sprayed. Since someone ask, here's how I mask off the small and numerous frame marks on the turrets (and other canopy areas). The clear pieces do provide for a rather well delineated frame design work. This allows me to cut and place small pieces of Bare Metal foil onto the surface. I then burnish the foil with a toothpick point, then trim the frame outline with a sharp no. 11 blade, followed by lifting one corner of each piece of foil to be removed (where the frame shows and needs to be painted) and pick up and off the piece of foil with my tweezer. When completed and following the final removal of the foil mask, I use a small amount of the Blue Magic plastic polish on the head of a Q-tip to lightly bull the clear area, followed by a bit more buffing with another end of the Q-tip and or a clean piece of cotton rag (this were all old t-shirts and underwear in general should go for their afterlife in my opinion - some of you haven’t arrived at that judgment yet had you?). One other reminder, those pesky little square do-dads along the wing’s leading edges are meant to be there. Don’t file or sand them off thinking they are a byproduct of the kit production process. They represent cable cutters built into the wings leading edge and were actually there, really! I recently read a review of this kit by a good friend (and very accomplished modeler) in the pages of Fine Scale Modeler – he thought it was a great kit and saw/encountered none of the problems I mention here. Hence, one needs to carefully consider the source of the review. I assume the problems and hurdles mentioned here are the results of my own short comings. But, I didn’t like some of what I found in the kit, especially when one considers that this is almost a $60 kit. For example, I just do not think the engine nacelles hang correctly as they came from the box and spent a good deal of time looking for photos and references to see how they should be positioned under the wings and try to get them into that position. There simply isn’t any excuse for these issues in today's’ market. If Tamiya can get it right, why can this Japanese firm? I also feel a bit more interior detail (both the flight deck area and especially the very large, open bomb bay) would have a nice touch. Possibly some of the many cottage industries “out there” will grace us with their offerings down the road. If for no other reason, this will allow the Lancaster to a $100 or more in value. I had to do a moderate amount of filling, using my old standby 3M Brand Acryl-Blue filler and small amounts of Apoxie Clay (which is much easier to work with around the very small openings and where surface details need to be carefully preserved). Along with the body filler, there was more sanding and re-scribing than I would like, especially along the fuselage seems (top and bottom) and around the engine nacelles and wing joint areas. Try though I might, I also couldn’t find a combination of the nacelle halves that resulted in both the top and bottom seems closely aligned or level. Again, it seems the nacelle halves were designed by different engineers who apparently weren’t on speaking terms. Inexcusable in any case in today’s engineering world. Decals: The decal sheet appears to be well done and provides the decals/combinations for three different Lancasters, the best know probably the “S” for Sugar (RAF # R5868) which has been so beautifully restored and displayed at the RAF Bomber Command wing of the Royal Air Force Museum at Hendon, just a short train trip west of London. This aircraft’s combat service record, with three different squadrons and markings, included 137 operational sorties. An intriguing portion of the aircraft’s markings while serving with the No. 467 Royal Australian Air Force flying from RAF Waddington, was the infamous quotation from Herman Göring. Early during the bomber offensive against Germany, the former Prussian WW I pilot (with 22 “kills” to his record and recipient of the Order Pour le Mérite – the “Blue Max”) positively stated “no enemy plane will fly over the Reich territory.” That was just one of his many notable errors in judgment. My kit’s roundels were just ever so slightly off register, as you can see from the completed kit. There are also a few missing decals for the elevator markings shown in the instructions – or maybe the instructions are just wrong? Paints & Finish: Another aspect of this model I enjoyed is that Italeri (probably because of its corporate connection with the Testor’s Corporation) clearly calls out its color references in Model Master references. Virtually the entire kit has been finished in Model Master enamels, with a very small amount of Humbrol and Winsor & Newton artist oils used for accent, shading and weathering wash. I used diluted artist oils and odorless mineral spirits (for weathering) and Ditzler automotive acrylic lacquer products (namely Duracryl lacquer thinner (DTL 876), Clear finish (D 468) and Ultra-Fill primer (PZA 43) and Testors Dullcote Lacquer finish (thinned approximately 150% with DTL 876 thinner. I used Devcon 5-Minute Epoxy and the Handibond Thick cyanoacrylate for most attachments and very small parts. Because I used a well thinned gloss black for the basic Lancaster finish, the kit decals went on very well, without the need for an initial gloss coat. I used both the Micro Scale Micro Set (I wet the surface as I slide the decal onto the surface) and Micro Sol solution and Tamiya Mr. Mark Softner to later soften, snuggle and tighten the decals to the surface prior to my final overcoat of Dullcote. The upper wing decals were the easiest to hide with subsequent glossing and sanding and glossing. The side and tail markings are quite a bit more challenging, since the underlying surface has a considerable amount of raised surface detail. Overall the kit decals are very well done (quality, color and options) and aside from the very small amount of register I mentioned on the large roundels, one doesn’t have to rush out and spend another $10 to $20 for aftermarket decals – at least not for my interests. As you can see, I am still working to achieve a reasonable weathering for such a model, though I know I have a great deal yet to learn as to colors and technique. It’s again not were I ultimately hope to achieve, but moving a bit closer to my objective. My Lancaster is completed as (I hope) it might have looked about the spring of 1944 and as closely as I could get to the configuration of the aircraft today at RAF Hendon. One serious point of contention though is the interior color. Most references call out the interior of the Lancasters as being basically black, though the Duxford and Hendon Museums display the typical mix of “British Interior Green,” along with black and gray instruments and faces. I had the opportunity to speak with several ex-Canadian Lancaster crew members while visiting England in the late 80’s and they told me their aircraft were typically painted “green” throughout the interior. I thoroughly enjoy the British WW II color schemes and found this kit a joy to paint, using the over semi-gloss black bottom and sides with dark green and dark earth top side colors. I was a bit shy of references for this project, though the three I had were very helpful and informative. These include the wonderful and richly illustrated The AVRO Lancaster, A Comprehensive Guide For The Modeler, by Richard Franks, Number 4 in the SAM Publications’ Modelers Datafile series. I am suspect of some of the drawings in this great book, but feel that you can’t do much better for overall information on the Lancaster, Manchester and Lincoln aircraft (all three of which are related in design and covered within this 176 page softbound book. My second indispensable guide was the small booklet, A Very Special Lancaster, A History of LANCASTER Mk I R5868, by F. E. Dymond. This 32-page booklet is sold at Hendon’s very well stocked bookstore and provides the best history I’ve seen of this particular historic aircraft including a complete operational mission listing. While not the greatest references, the AVRO Lancaster by Bill Sweetman from Crown Publishers can’t be overlooked. This book (as in the case of the other similar Crown publications) provides one more inspiration to build the Lancaster kit. Rikyu Watanabe’s artwork is very inspirational to me. Even though I’ve been warned about his technical details and colors, the richness, size and sheer beauty of his artwork is fantastic in my opinion. List price on this kit is approximately $60. which I feel is a bit high for the amount of material, engineering and “product” in this kit. I purchased my over the internet from HobbyLand for approximately $48.00. Summary: If you are as interested in WW II aircraft as I am, you have to buy and build this kit. It’s really light years ahead of the older Revell and Airfix kits and helps fill that critical nitch; other than the name, there is little similarity. In spite of the several “issues” I mentioned above, this Lancaster looks and “feels” right to me from almost every aspect. It seems a shame that with almost 7400 of these dependable bombers built by and under license to AVRO there are so few survivor Lancasters today. As much as I dread the prospect of doing another Lancaster (and the cost…..), both the Damn Busters and bunker busting “tall boy” versions may just force me to do it again….. Boy, are we modelers predicable or what? If you long to model Britain’s greatest bomber of World War II, this Hasegawa kit is where you want to direct your efforts. |
|
) |
) |
) |
|
|
Information, images, and all other items placed electronically on this site are the intellectual property of IPMS/USA ®. |
|