|
Attack Hobby Kits 1/144 MiG 15 UTI |
|
|
Kit Number 14405 |
|
|
Reviewed By John R. Lee, #1172 |
|
|
|
|
|
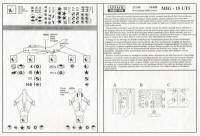
MSRP: $9.98 USD The Attack Hobby Kits Company is new (to me at least) in my preferred scale of 1/144th. It is typical of the massive flow of kits coming out of the Czech Republic of late. This is the fifth offering in this scale from Attack that I know of, with some MiG-17s also available. This kit is boxed as the MiG-15UTI. It looks like what has been called a limited run kit but there is almost no flash on any of the parts. The panel lines are recessed and look good. I found the plastic in the kit very easy to work with. It’s a little soft, but glued well. I used Testors liquid glue mostly with CA for the landing gears and as filler at the wing to fuselage joins. There are twenty-eight light gray and one rather cloudy ‘clear’ part for the cockpit canopy (it’s the only poor fitting part) and five decal options. See photo #1.
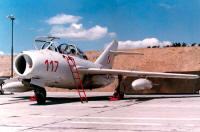
The assembly process moved on rather quickly due to the limited number of parts. The one major problem with this kit is that it is supposed to be a two seat aircraft is that the parts are the same in both the MiG-15 (single seat) kit #14404 and this. In other words, both kits represent single seat aircraft. To make sure I checked the contents of two kits that a friend of mine has and both of his kits are also cast as single seat aircraft, photo #3. As there is no cockpit in the model other than a small depression where the cockpit would be (photo #4), I expanded it out to represent the two-cockpit area (photos #5 & 6). I will paint this area black before adding the cockpit canopy. I would normally have added a scratch built cockpit but I believe that a review kit should be built as received or as close to it other than adding antennas and pitot tubes. I started out by placing a piece of lead in the front area of the fuselage prior to gluing the two halves together to keep it sitting on the nose gear. With the wings and tail parts being of the usual “limited run’ butt joints, I drilled the wings and tail parts and inserted short pieces of brass rods to strengthen the joints, photo #5. After gluing the wings in place I filled the wing to fuselage gap with Superglue. After that had dried over night I sanded it smooth with various grades of wet and dry. Next I added the stabilizers and nose cone. For the guns you can see in the picture #2 that there is only one cannon mounted on the left side of this aircraft so I placed the long barreled 23mm cannon in place. I stuck an old chopstick up the tail pipe hole to hold the model and sprayed on a few coats of Floquil Reefer White, followed by a couple of coats of Model Master Clear Gloss. I set the kit aside for a few days to let it all dry hard. I then added the decals which are very nice, sharp and in register. I used only Micro Set and they settled into the panel lines ok. I think it helps a little in that when the decals are drying I roll a wet Q-tip over the decal to squash out any air and press it into the panel lines. Again I let them dry a day and after washing off any setting solution I added another coat of MM Clear Gloss. I then added the painted landing gear parts and gear doors, which are all butt joints. The main gear doors are cut into three pieces. I then made up the two fuel tanks, sanded the seams and sprayed them Floquil Reefer White. I also drilled and inserted a small piece of wire into the mounting bracket to add support. I then added them to the wings. I added a piece of stainless steel dental wire for the antenna running from the fin to the fuselage by the starboard side of the canopy. A short piece of brass rod to represent the angled pole antenna by the canopy was also added. I had earlier drilled a .016Ø hole into the right wing leading edge and I placed a piece of wire in it to represent the pitot tube. Next I added a few dabs of red, green and white to represent the navigation lights as seen in various pictures. After all this was completed I pushed the tail pipe into place that I had painted early on in the build. It is a press fit requiring no glue and we’re done. As can be seen in photo #2, the aircraft is very clean so that I did not do any weathering to this model. As with most kits there is scope to add a bit of “Super Detailing” especially a cockpit if you want. Recommended to all modelers. This kit is available through most fine hobby shops and various mail order companies including Squadron Mail Order (972-242-8663). References used:
Thanks to John Noack and Attack Models (www.attack-hobby-kit.cz) for the kit, a great and unusual addition to my model shelf. I would further like to thank Karin Hill, Promotions & Special Sales from Specialty Press for contacting Yefim Gordon to allow me to use the picture from the WarbirdTech series Volume #40 page 72 to verify the White color and type of aircraft #117 in fact is. |
|
|
|
 |
 |
|
|
|
|
|
|
|
|
Information, images, and all other items placed electronically on this site are the intellectual property of IPMS/USA ®. |
|
